Saturday, July 20, 2019

July 2019: More Monitoring – with CCTV

A Typical Robust Wired Closed Circuit TV (CCTV) Architecture
Having made good progress on a remote monitoring project for Ghost Rider (LINKwe had also decided to take the next logical step and pursue another significant and closely related boat project: visual monitoring via cameras in a closed circuit configuration.  (Admittedly, the words 'logical' and 'boat' don't often collide in the same sentence...indulge us on this one.)  And once again we wanted to go as wireless as possible so as to avoid tearing up the boat trying to run cables all over the place.

The most common visual monitoring objective on a vessel like Ghost Rider is to have remote but real time camera views into the engine room while underway; it’s comforting (and something of a safety factor) to be able to see what’s going on down in the engineering spaces without having to leave the pilot house helm station.  Secondarily, having some visual view of the boat on a smartphone while physically separated from the boat is a nice security complement to the remote sensor readings we had installed for battery, shore power and bilge level status.  While it would also be beneficial to have the equivalent of a “back up camera” when executing a stern-in docking maneuver, this system would not satisfy that function.  Those typically require a reverse (mirror) and wide angle orientation that require a separate and more specialized camera device.
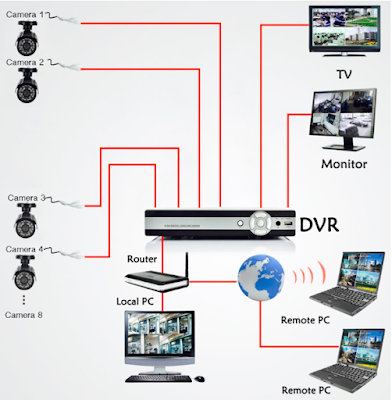
What We Aimed to Accomplish with a Simplified Wireless CCTV System
Such CCTV systems are preferably included during the build phase of the boat – cameras can be positioned and powered as needed, and that’s the time to be routing the hard-wired cabling formerly associated with high resolution video transmissions.  But lately retrofitting such a system had been getting a good deal more practical with all the advances in wireless (Wi-Fi) security systems.  Nevertheless, achieving reliable wireless video transport with multiple sound-proofed bulkheads to penetrate and various deck levels to traverse was not necessarily a given….that would take some research and testing, and perhaps some luck.

To be clear, this was not intended to be just the popular home security doorbell camera architecture – those are typically cloud-based with a handy but very small smart phone display (think “Ring”, “Blink”, etc.) and a reliance on some external connectivity (Internet, cellular, etc.)  In subtle contrast a CCTV (closed circuit television) system relies mainly on an internal network where remote access is a nice-to-have or secondary benefit.  Our basic requirements consisted of: (1) weather resistant IP cameras connecting to the boat’s existing wireless (2.4/5.8 GHz) LAN; (2) wired (AC powered) cameras to avoid battery powered device issues; (3) cameras with decent resolution (1080P) and low-light capability; (4) at least one dedicated and integrated onboard video display; (5) NVR/DVR recording and playback; (5) optional Cloud/Internet access to captured video; and (6) a price point under $400 USD for four cameras.  Note that we did not care much about PTZ (pan, tilt & zoom) as we viewed that as an unnecessary complexity and cost based on our planned placement and usage.
The Contents of the Cromorc Wireless Camera System Package

Based on the foregoing, and after considerable time snooping options and online reviews, our initial system choice was a Cromorc™  package (LINK). It included four wireless IP bullet cameras (with AC power plugs), a 10 inch dedicated display monitor attached to a compact NVR, the latter sporting an Ethernet port for LAN connectivity plus an HDMI output for an additional display monitor.

For the trial portion of the project we started with three cameras – two in the engine room and one in the pilot house.  (This particular system supports up to eight cameras.)  Initial setup and configuration were amazingly easy….Rick just plugged in the cameras, then plugged in the NVR to its power outlet as well as to the boat’s wireless router via a Cat-5 Ethernet patch cable.  And as soon as the system was booted up it ran through an automated configuration utility requiring a few mouse clicks, and we could see all three camera displays on the included display monitor.  After testing the camera unit signals in the engine room with doors sealed and the engine running we were pretty sure we had a good solution.  Rick then added an HDMI cable connection between the NVR and the ship’s existing PC monitor for an optional (and larger) second display.
The Four Camera Display (Only Three Active)....on the Left Side of the Pic is the Ship's 17" PC Monitor,
on the Right Side is the 10" Monitor that Came with the Cromorc NVR Device.
After all that the only relatively challenging tasks started – finding good places to permanently mount the cameras and providing for their AC power cord runs.  We ended up with two cameras in the engine room along its centerline, one forward and one aft, plus another in a back corner of the pilot house.  We also tested remote camera access via the included smartphone app  and a web browser – which also worked as advertised, giving us an additional remote security tool to complement the remote sensor devices now also in place.  Rick still has to tidy up the AC power cord run for the pilot house camera, but doesn't anticipate that to take long.

Conclusion
For the $300 USD outlay (via Amazon, LINK HERE) we were quite pleased with the Cromorc wireless camera system.  Connectivity setup among the cameras and the NVR/monitor unit was dead nuts simple.  (In that regard the review at this YouTube LINK is quite accurate.) Displays were crisp (technically only 960P vs. 1080P but still quite good), including surprisingly good low-light shots in a blacked-out engine room.  And our limited testing to this point has demonstrated very good transmission signal strength using the 2.4 GHz wireless spectrum, even from deep within a sealed up engine room.
A Single Camera Display....This Low-Light Shot of a Darkened Engine Room Impressed Us With Its Clarity
Same Single Camera Display for the Forward Engine Room Camera but with Full Lighting
Other Competitors Considered
Other camera system brands were considered but they are far too numerous to list; just Google “wireless CCTV camera systems” and you’ll get the idea.  Rick had been performing online research off and on for about a year, and the number of options were - and still are - dizzying. Given the volume of competition, it’s a reasonably safe bet that some of those others might have worked nearly as well.  But given our initial success with the Cromorc system we didn't feel compelled to find out.
The Red Arrow Points to the Aft Mounted Engine Room
Camera, the Black Arrow to the One in the Front.
What's Next
Mounting the fourth camera - if and when we determine a good location for it - will be an entirely separate project. Having a spare camera on hand isn't a bad idea, either (although you can buy more if needed at around $50 USD per camera.) But longevity and durability will take more time to ascertain. 

Thus far we've only performed limited testing of the system's recording and playback capability with its included terabyte hard drive, but that looks promising so far.  It records everything by default, but that is easy enough to modify or just disable depending on your preferences.  The system also supports motion detection recording and alerts, and we proved that works, too, although we need to get educated on the best way to configure that.  While you have very granular control on when the camera records based on motion, the alerting function (via email over a Wi-Fi Internet connection) is either always-off or always-on....making it very easy to spam yourself.

Some Screen Shots
Here are some application screen shots for accessing the boat's cameras remotely, both from the  web portal as well as the included smart phone app.
This is the Browser-Based Portal for the Camera System Although It Seems to Run Only in IE & is a Bit Buggy.  Better
to Use the Included Smart Phone App (See Below.)  The Top Two Views Are in a Completely Dark Engine Room.
An Android Smart Phone App Screen Shot.  Best Used When You Have
WiFi Access, But Does Work Via Cellular Data if You Don't Mind
the Rather Significant Data Plan Usage.
Another Android Smart Phone App Screen Shot
And Another Full Screen Shot from the Pilot House Camera via the Phone App
A Screen Capture of What the "Motion Detection Alert" Email Looks Like When We Set That Up for the Pilot House.
It Appeared to Be a Little Too Sensitive on Default Settings. That Feature Will Require Further Tweaks & Testing.

Friday, July 12, 2019

Jun-Jul 2019: A Boat Monitoring Project

There is an old theorem in the yacht ownership universe ("yacht" being code for an over-complicated boat) that has several nuanced variations, but each version generally goes something like this:
  • Q: How do you become a millionaire? 
  • A: Start out as a billionaire and then buy a boat. 
So in that spirit, here’s another installment in what seems to be a continuing series of how to spend money on boating without (currently at least) doing much boating.

The Match-box Sized Trackimo Device Locates Ghost Rider on a 24-by-7
Basis via Cellular & GPS Triangulation & Until Now Has Been the Only
"Monitoring" Device Aboard the Boat.
As mentioned in a previous blog post, we had decided to pursue a remote boat monitoring solution for Ghost Rider.  Up until this year we had spent most of our time aboard, and any short separations were mostly when the boat was on the hard for maintenance. So this hadn’t been a priority until very recently when medical issues grounded us for a spell. While we had already installed a GPS locating device  with geo-fencing capabilities (Trackimo, which is similar to a LoJack device), and it gave us and the insurance company a certain level of comfort, more was needed.

Our objectives for a remote monitoring system had now gone beyond just knowing the boat still remained where we left it.  While there are other sensors we might add once we proved out the chosen system, initially we wanted to know about these high priority items when away from the boat: (1) house battery voltage; (2) shore power connection status; and (3) bilge water level.  Likewise, when any measurement varied from a defined allowable range, we wanted to be immediately notified via email or SMS text message so that intervention, troubleshooting and remediation could begin sooner rather than later.  

The “why” behind all of this is pretty straightforward – for instance, letting a house battery bank deplete to too low of a charge level (due to loss of shore power or a charger failure) could cost us around $5,000 USD for six new 8D AGM batteries.  Similarly, rising water levels in the bilge cavity could indicate seawater intrusion (say, from a failed thru-hull), something with which we have some nasty and expensive experience.  An early alert system of some sort would be much more cost effective than just crossing our fingers and hoping for the best.  Obtaining a truly decent ROI on any boat project is about as rare as an honest politician, so if we could actually find one then  it merited pursuit.
Our Initial Monnit Purchase: Two Remote Voltage Sensors, Plus the Cellular
Gateway Pictured with its Removable Antennae and Power Plug. After
Initial Testing We Added Two More Sensors.
Our system requirements included (1) a modular system where sensors could be added when/as needed; (2) a 4G LTE cellular gateway transmitter with its own SIM card to send notifications (U.S. based would be OK for now); (3) completely wireless sensors, preferably talking to the gateway in the 900 MHz radio frequency band for reliable wireless signal range; (4) a wide selection of said sensors for both current requirements and future expansion; (5) web-based and smart phone user interfaces for system administration and sensor reading access; (6)  a price point that provides a reasonable ROI….preferably under $1,000 (USD) for equipment outlay plus low-to-no subscription fees; and (7) a track record of quality and reliability, with decent online support.

Our 4G connectivity and wireless sensor requirements eliminated well over half of the potential field, leaving only a couple of contenders.  And a few more were priced in the “marine tradition” – i.e., if intended for a boat it must be unreasonably expensive.  We finally settled on a brand called Monnit™ (LINK), which oddly enough does not advertise its system for marine / vessel use, but boasts a fairly robust industry footprint among food services, data centers and general facility management.  We were also hopeful their client landscape would lend some staying power vs. some of the specialty (and over-priced) marine monitor systems that have flamed out or fallen behind the tech curve in recent years.
After Testing of the Voltage Sensors We Then Ordered a Water
Level Sensor for the Bilge

We were concerned most of all with the effective range of any water detection sensor in the bilge cavity, since that is deep within the bowels of the boat and closed off by a very well insulated engine room. Bench-testing the Monnit equipment back at the condo over 75’ distances and using closed metal closet doors had produced good results, and we weren't disappointed when it came to the real world install on the boat. The sensor transmission strength signals remained strong regardless of where we stuck the things.

Observations, Challenges & Concerns
Setting up the Monnit Gateway device was easy and straightforward, as was registering each of the individual wireless monitors so that they became part of the desired monitoring network. The same was true for defining allowable measurement ranges and monitoring intervals.  The browser-based configuration and reporting utility takes some getting used to, but with some practice it didn't take long to learn how to navigate and use it for system administration.  

Mounting and wiring each of the monitors was also fairly straightforward, although the one for the shore power tap required considerable sleuthing with the multimeter for a good tap-in location; and Rick had to attach (crimp and heat shrink) ring leads to the bare wire ends of the battery voltage monitor.  As an aside, monitoring for shore power presence wasn't exactly intuitive....see the "caveat" further down in this blog post.

The Yellow Arrow Points to the Installed House Battery Bank Sensor (in the
Lazarette) Which is Connected to the Positive & Negative Posts
 (Red & Black Arrows) of the Last Battery of the Six  in that Battery Bank.
The biggest concern going forward will be the sensor durability in the hot and humid marine environment in SW Florida, where salt-laden air could eventually affect any of the devices over time. The gateway won’t be of particular concern as it lives in the protected pilot house. The bilge sensor should fare OK as the sensor’s PCB and antenna are several feet above the actual water pickup sensor, and the engine room tends to be a hot, dry place anyway. The house batt and shore power sensors in the lazarette will likely have the most continuous exposure to the salt air, although their locations are protected from direct water sprays.  

As an aside, we corresponded with the Monnit engineers on applying a thin coat of CRC Corrosion Block to the sensors, but they weren’t crazy about that idea.  It also turns out they now have “Industrial” grade sensors with IP65 ratings which could likely last a good deal longer in the marine environment.  We’d recommend (as do the Monnit engineers) that more expensive option if just starting out, but see pricing comments below.   

It's also worth noting here that Monnit currently has two versions (what they call gen1 and gen2) of each sensor and you cannot mix and match them.  We went with the gen2 versions branded as "Alta" since they boast  improved circuitry and greater wireless range.   The other unknown is sensor battery life - these use a 3V coin battery advertised for an average of two years of longevity, but only time will tell.
The Shore Power Monitor (Yellow Arrow) Back
in the Lazarette, Where We Tapped into 
the Inverter (Red Arrow)

Conclusions
Overall our Monnit system has worked as desired and planned thus far.  We will want to figure out how to easily pause the monitoring network when it’s not needed (e.g., while cruising and living aboard) so that we don’t unnecessarily eat batteries, but that's a nit.  We’ll probably add some startup and shutdown actions to our existing departure and arrival checklists.  The web-based and smart phone remote access portals are also very good - see the screen captures at the end of the blog entry for some samples.

We also added a fourth sensor for the boat's cabin temperature, figuring it would be helpful to know if the air conditioning system takes a dive even if everything else is humming along nicely.  And for reference the whole thing still came in around $700 USD.  Using the aforementioned “Industrial” grade sensors, which probably (in hindsight) would have been a better idea, would add a premium to each sensor, so the total price tag would be closer to our magic $1,000 threshold, especially once tax and shipping fees are factored in.  Also note the industrial versions use a Tadiran lithium battery which cost four times what a coin cell battery does, but theoretically also last four times longer.

Some other notes on subscription fees and cellular communications:  With the Monnit system the standard sensor heartbeat interval is 120 minutes with sensor readings at 20 minute intervals (6 per heartbeat span) and typically should be sufficient.  There is a $10 per month data subscription fee for usage up to 1 MB, but there are no other extra fees unless you exceed  that 1 MB of gateway data ($5 for another MB, then $3 per MB thereafter.)  Generally that shouldn’t happen unless you let a sensor alarm keep triggering without intervention (which we discovered when testing the SMS and Email notifications.) 

If shorter / faster “heartbeat” intervals are desired then the “Premier” service subscription at an additional $39 per year may make more sense but is still a reasonable price; that also provides a host of other more advanced functions which may or may not be of interest.  As for the cellular portion, the chosen Monnit gateway uses an AT&T or Verizon SIM card, so it's fine for the U.S. where those carriers' coverage is decent.  Other options exist (Ethernet or custom SIM gateways) so we suspect the Monnit solution would work elsewhere.

The Temperature Sensor Tucked Away in the Port Aft
Corner of the Pilot House
A final procurement note:  for anyone interested in pursuing this solution, when you buy from Monnit you are buying direct from the manufacturer of the devices; that means when you order sensors they need some time (about 7 to 10 days in our experience) to actually build  and ship them….they don’t carry inventory.  That said, their online (email) and telephone support is excellent.

There is another and nearly identical purchasing option at the "My BoatStatus" web site (see links below), a company who also source their devices from Monnit; they do carry inventory, but there you will find some price markups vs. the Monnit direct pricing.  Other brands that were considered are listed near the bottom of this blog entry along with their associated web site links.

We’ll provide periodic updates on the system’s reliability and durability, but for now we are quite pleased with the result, and are calling the project a success.

Caveats on Shore Power Monitoring
Wiring up this particular voltage monitor was a challenge, as how and where to monitor the AC voltage coming in from the shore power pedestal isn’t exactly obvious...at least it wasn't to Rick.  This is partially due to Rick's grade school level of electrical expertise, but also to how the boat’s charger/inverter unit works. 

When our (Xantrex) inverter is online and senses the presence of shore power current it simply goes into a pass-through mode and sends that power current to the boat’s AC distribution panel.  But if/when shore power is interrupted it will automatically and immediately go into its inverter mode and start generating ("inverting") 120 VAC power from the 12 volt house battery bank, and pass that power to the AC panel.  So monitoring for the presence of AC power downstream of the inverter unit is not particularly beneficial for this purpose.  (You can put the inverter in “bypass” mode but you would have to accept that a loss of shore power would result in an electrically dead boat….that would be OK if you planned for an extended layup but otherwise would be problematic.) 
The (Bilge) Water Sensor....Red Arrow Points to the Actual
Water Sensor Pickup (Mounted on the Shelf for the High Water
Bilge Pump).  Yellow Arrow Points to the Sensor Housing
and its Antenna Mounted a Couple Feet Above the Pickup.
This is in the Engine Room Just Aft of the Main Engine,

One could also place the voltage monitor tap at a constantly powered 240 VAC circuit or outlet (the inverter only provides 120 VAC, the 240 VAC juice has to come from either shore power or the generator), but that’s not as easy as it sounds, at least not on Ghost Rider.  The other alternative we eventually figured out was to just tap into the AC lines coming into the inverter, which is what we ultimately did.  That tap is only on one of the two incoming 120V shore power legs, but that's sufficient for our purposes.

Other Competitors Considered
Other solutions considered but not pursued further include those listed below.  There are probably others out there.  Several of these also include the GPS location and geo-fencing service within their monitoring solution, which we already had installed via Trackimo and did not want to replicate:

➢ Boat Command….requires running wired cabling (LINK)
 Boat Nanny….acquired by GOST
 Go Free marine…. requires running wired cabling (LINK)
 GOST….way too pricey for us (LINK)
 Kobelt….very sophisticated, requires N2K, could not find pricing (LINK)
 Maretron….requires N2K wire runs, also quite pricey* (LINK)
 Mazu Marine….satellite based, hefty subscription, but works anywhere (LINK)
 My Boat Status….uses Monnit-supplied devices, too, but with price markups (LINK)
➢ Simrad BoatConnect....also requires running wired cabling (LINK)
 Siren Marine….their wireless version is fairly new, good reviews, but pricier (LINK)

(* If you're already a Maretron user this "pricey" comment may not apply and would be worth evaluating further.)

What’s Next
Oh yes indeed, Rick already has another boat project in mind….this one to find a CCTV camera solution for visual monitoring of certain conditions / areas.  Once again the desire is to find a mostly wireless solution to avoid tearing the boat apart to run cabling.  It should be an interesting exercise.

Some Screen Shots
Here are some application screen shots, both from the iMonnit web portal as well as the included smart phone app.  (Side note: their web portal sports two user interface experiences....Rick tends to favor the older "classic" look, but that's highly subjective.)  At any rate, these are just a small subset of what's available:
Screen Shot of the List of Notifications (Event Triggers) Defined for the Four Sensors and
Gateway Device...from the iMonnit Web Portal

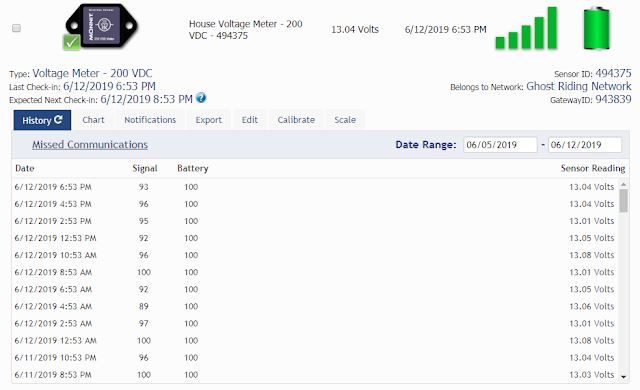
Screen Shot of Shore Power Sensor Readings from the iMonnit Web Portal
Screen Shot of House Battery Bank Sensor Readings from the iMonnit Web Portal
Another Screen Shot Demonstrating the Graph Depiction of the House Battery Readings...That Spike is During a
"Bulk Charge" Period.  And Yes, These Are Obviously Temperature-Compensated Voltage Readings.  It's HOT Here.

An Android Smart Phone App Screen Shot.....This Example
Showing House Battery Bank Sensor Readings
Another Android Smart Phone App Screen Shot.....This One Showing Graph & Sensor 
Readings for the Shore Power Monitor

Jun-Jul 2019: Some Routine Maintenance

The Red Arrow Points to Our Original Slip Location at Legacy Harbour. 
 The Green Arrow Points Out Our New Location in Slip B-11.  
It's Like a Different Zip Code.
While the month of June had been reserved mostly for Rick’s post-surgical recovery and a couple of “special projects” (remote monitoring and CCTV camera solutions, separate blogs to follow) we still had to tend to the more mundane and regular maintenance tasks that Ghost Rider requires to stay healthy and seaworthy.

But at the top of our June list was moving the boat from the far end of Legacy Harbour’s “D” dock (slip # D-22, which we have joked is in a different zip code than the remainder of the marina) to a much closer-in slip on the “B” dock.  With the departure of a large number of snow-bird boats in May, Eric (the dockmaster) was able to reserve B-11 for us.  So we picked a dry and calm June afternoon and maneuvered Ghost Rider to its new summer mooring. Given the hot, humid and frequently stormy summer weather here in southwest Florida, the shorter walk from the parking lot is much appreciated.
Transmission Fluid (Common ATF) and Filter
Change on the Wing Engine
As for the routine maintenance coming due, our trusty Wheelhouse software is a reliable nag in that regard.  One of the recurring weekly tasks is to clean the strainer basket for the Cruisair air conditioning raw (sea) water feed, but that interval was proving inadequate.  In the very warm and shallow waters of the Caloosahatchee River where Ghost Rider is moored for the summer, the accumulation rate of fouling mud and fine grasses has led us to an every-four-day service interval.  (As an aside: back in May when our unfortunate hospitalization regimen kept us from the boat for a three week period, that strainer basket got so clogged it was beyond recognition; it took Chelle an hour to clear the strainer basket, and Rick another hour of scrubbing and vacuuming the strainer housing.  We've seen Florida swamps that looked sterile in comparison.)

Oil and Filter Changes on the Wing Engine
Another recurring set of chores pertains to our trusty wing engine, a 70 HP Lugger diesel that provides hydraulic power for the boat and also serves as backup propulsion to the main engine.  Since the wing doesn’t rack up the hours that the main engine and generator do, its service interval is generally calendar-based.  Every two years its transmission fluid and filter need to be changed, and while the fluid removal requires use of a hand pump (it is not plumbed to the Reverso oil change pump), it’s a fairly easy task.  Its annual service routine consists of changing the oil and oil filter, the secondary (on-engine) fuel filter, the primary (Racor) fuel filter, and checking the impeller on the raw water pump.  Rick got all of that done, plus replacing the two-micron Racor filter for the fuel transfer pump, in less than two hours....which is pretty good for him.

A slightly larger maintenance effort was the coolant flush for the main engine.  That beast (a 300 HP Lugger 6108 with heat exchanger cooling) holds over five gallons of the stuff, and its coolant needs to be flushed and refreshed every 750 hours or every two years, whichever occurs first.  The big Lugger diesels are fairly finicky about coolant – it has to meet precise OEM specifications which include specific SCA’s (supplemental coolant additives) and also must not utilize OAT/HOAT (organic acid technology.) 


Draining the Old Coolant from the Main Engine.
The Green "Form-a-Funnel" Can Be Molded to
Any Shape, Wraps Around the Drain Cock,

 and Provides Enough Extension to Reach the
Catch Bucket.
Our Lugger diesel expert Bob Senter also warned against the use of “extended life” coolant, which he labels “marketing hogwash.”  We only use Peak Fleet Charge 50/50 in all three diesels, which satisfies all the specs, although it isn’t always easy to find.  (Amazon to the rescue!)  Even the mixing ratio of 50% antifreeze to 50% of pristine distilled water is considered critical, which is why we use the factory premixed product....that removes all the guesswork.

With the right equipment the drain/flush/refill effort isn’t particularly difficult, it just takes a while given the five gallon capacity.  The whole process took Rick about two hours including the fresh water flushing. The evacuated coolant was remarkably clean and free from debris, indicating healthy internals. 

The (green) “Form-a-Funnel” device in the accompanying picture contributed to the ease and avoided a potential mess given the location of the engine block’s drain cock.  By the way, we always put our drained oil, transmission fluid or coolant in sealed containers for proper disposal or recycling.  At Legacy Harbour that disposal is an included service, although some U.S. marinas charge a fee for that.

After Draining and Flushing the Big Diesel We Added the Premixed (50/50 Solution) of the Peak Brand Fleet
Charge Coolant.  Interestingly the Engine Manual Indicates a 4.5 Gallon Capacity, but We Removed and Replaced
Closer to 5.5 Gallons of the Stuff.

So while we've been able to keep up with Ghost Rider's recommended maintenance tasks, unfortunately we also encountered another problem to be added to our "punch list".  Shortly after cleaning the major clog in the sea strainer for the air conditioning system we experienced "High Pressure" errors on several of the air handlers.  We were able to clear all but one, the recalcitrant one being in the master stateroom.  Rick tried his usual tricks -- running reverse cycle heat, a factory reset, running bleach and Superclean through the strainer -- but to no avail.  While it's been oppressively hot here, the stateroom still remains comfortable enough with the other three systems running normally, but we'll still need a service call to resolve.

Ghost Rider Secured in Her New -- and Much More Convenient -- Slip at Legacy Harbour Marina.
Happy Birthday, America!  We Had a Good View of the Riverfront July 4th Fireworks from the Deck
of Ghost Rider.  Earlier in the Evening Mother Nature Displayed Her Own Fireworks with a Line of Strong
Thunderstorms, but Fortunately It All Cleared Out Just After Sunset.  Best of All...No Trump, No Tanks.