Friday, September 20, 2019

Sep 2019: After Hurricane Dorian

Ghost Rider's Bottom Paint Getting a Much Needed Waterline Touch Up.
Rick didn’t visit RFYC and Ghost Rider again until Tuesday, 10-September, when he made the drive to check on work order progress and to coordinate logistics for splashing the boat once it was again ready for sea duty. 

The RFYC crew had been busy….they were about 80% complete with the bottom paint touch-up job, and had already torn into the two raw water intake seacocks for the main engine.  The one on the port side checked out OK – we visually verified the ball valve was moving to the closed position, plus they removed a hose end and poured water in to verify the ball valve wasn’t leaking.
Where the Starboard Side Seacock Used to Be.
The starboard side seacock definitely had a problem, though.  While we could visually verify the ball valve was moving to the closed position, when we performed the same leak check it was a veritable sieve.  Under pressure it would produce the scary flow that Rick had observed last time he tried to clean out its strainer basket.  Our guess was either there was upward play in the ball valve mechanism away from the sealing surface, or the Teflon sealing seat between the ball and housing was shot, or both – either way it would no longer serviceable.  The Groco replacement unit was due to arrive the following day.  (As it turned out, during bench testing of the removed seacock Rick discovered that the handle was traveling beyond the 90 degree closed position to a partially open condition - the mechanical stop had broken off the handle.)

Rick attacked a few new Wheelhouse maintenance items during this visit and also reconnected the boat’s WiFi system and camera network to the marina’s hotspot.  Along with the previously reconnected Monnit remote sensors, we now had our full remote monitoring solution back in service.

Two days later on Thursday, 12-September, after John (the yard manager) had called to verify they would be completing the work that day, Rick returned to RFYC and the boat.  This trip was to inspect the work on the bottom paint and the seacock, and to insure the boat was ready for splashing the next morning.  Everything looked good – the bottom paint touch up job was neat and thorough, and all seacock plumbing, hoses and clamps passed ready-for-sea inspection.
Bottom Side of the Removed Seacock.

Except for a few closed thru-hulls in the lazarette (mostly cooling circuits that tend to cavitate later if not closed off when on the hard) Rick also completed the engine room and laz preflight inspections.  That way we would be ready to startup soon after relaunching.  He also spent a little time wire brushing some barnacles off of some thru-hull trim rings and strainer slots; after that the bottom looked very good indeed.  The rest of the boat, however, was a dusty, grimy and bug-stained mess, so before leaving it for the day Rick gave Ghost Rider a quick hose down.

While we were hoping to splash the boat the following morning (Friday, 13-September), the weather forecast was changing quickly and not for the better.  The NHC was now calling for a tropical system of some sort to approach south Florida as the weekend neared, so we decided to leave Ghost Rider parked on the RFYC pad for the weekend.  Once again the models behind the NHC's cone of probability diverged significantly, with a wide gap between the GFS and Euro model path predictions.  The good news was that neither was calling for anything beyond tropical storm strength locally.  But with the likelihood of increasing TRW coverage along with windy conditions we decided to wait until this one passed.
By Saturday Tropical Storm Humberto Had Formed But Was Already Turning North & Staying Away From Florida.  A New  Disturbance Started to Spin in the Gulf but Was Moving Away Towards Texas.  We Would Need to Keep an Eye on the Other Three in the Middle of the Atlantic, but They Wouldn't Delay Our Plan to Splash Ghost Rider.
By Saturday morning, 14-September, NOAA's 5-day tropical outlook map was looking more like a game of tic-tac-toe with the number of potential hot spots it was tracking.  On Saturday night, caught between two low pressure systems, it rained like hell here. But as one (Hurricane Humberto) began to pull away to the north, and the other to the west towards Texas, they had sucked away most of moisture with them by late Sunday.

That made the weather forecast for Monday, 16-September pretty good for the slow slog down river back to Fort Myers.  So we dropped one car at Legacy Harbour and drove the other to RFYC.  We splashed Ghost Rider around 1030 and after leak-checking the new thru-hull seacock we were ready to take the boat back down river to Fort Myers.  The sortie down the big ditch was mostly uneventful -- both locks and the two low bridges were prompt in opening and we were the only traffic heading west on the Caloosahatchee this day.  We had good weather, with temps reaching the low 90's and just fair weather "popcorn" cumulus clouds.

Ghost Rider ran perfectly again -- right until we were attempting to dock at Legacy Harbour.  That's when the electronic throttle for the main engine failed.  Shit.
The Scarred Rub Rail on the Port Side Where Ghost Rider Crunched the Concrete Dock Piling After the Electronic
Throttle Failed in Forward Gear.  Use of the Bow Thruster Avoided a Direct Hit on the Anchor & Bow Pulpit, Which
Would Have Been Really Nasty.
And it failed (died...totally dead) while in forward gear, so Ghost Rider crunched the port side bow rub rail on a concrete piling before we got the main shut down and backed off using the wing engine.  We had a 15 knot crosswind for the stern-in docking maneuver, and that wasn't going to work with wing-only propulsion, so we backed down to a side tie near the entrance to the fairway.  

To say that Rick was torqued off would be the understatement of the decade.  More about troubleshooting and repairs in the next blog post.

A Close-up of the Rub Rail Scar.  There is Another Just Aft of This One.  And a Couple of FRP Scars Opposite
 on the Starboard Side.  This Won't Be a Cheap Repair.
Head-on View from A Distance at Our Temporary Slip....Ghost Rider Still Looks Good.  Up Close - Not So Much.
The Damage is Not Obvious Until One Gets Close.

Saturday, September 7, 2019

Aug-Sep 2019: Hurricane Dorian

The Early Path Predictions for This Storm Covered a Huge Area.  Marinas &
Boat Owners Had to Make Decisions Early.
From August through October hurricanes are an annoying but normal part of life in Florida.  The damned things are inevitable, and with climate change accelerating at an alarming pace they are also getting more frequent and stronger.  And that’s why we always give ourselves a bailout option.  This year we knew we would be stuck in Florida for the tropical storm season, so we signed up for the hurricane club at the River Forest Yachting Center (RFYC) in Labelle, Fl.  That facility is 40 miles up-river from our Fort Myers (Legacy Harbour) mooring, with two locks (meaning no storm surge) between it and the open ocean, and with an expansive apron of concrete dotted with embedded tie-down anchors.  It was designed specifically to offer safe harbor from big blows.
Our Satellite Tracker Path from Fort Myers to River Forest Yachting Center
Near Labelle, Florida.
When the forecast for TD5 suddenly went from a dissipating tropical storm to a major hurricane named Dorian in the span of a couple of days, it definitely got our attention.  And when the Euro model’s forecast track had it going from Palm Beach on the east coast and straight over Fort Myers on the west coast of the state at formidable strength, we decided to move the boat to RFYC.  We had been intending to take the boat there for some maintenance attention anyway, and this was a compelling trigger.

A Nordhavn 55, Fusion, Heading in the Opposite Direction....for Good Reason.
Thus on Friday, 30-Aug, we were up at 0600 and underway just before the 0700 sunrise, chugging eastward up the Caloosahatchee River at a steady 7.8 knots.  In spite of the two locks (Franklin & Ortona) and a few bridge openings to negotiate, we covered the 40 NM in just five and a half hours, arriving at RFYC by 1230.  Surprisingly there was only sparse boat traffic along the way, one of which was a westbound Nordhavn 55, Fusion, who via VHF told us “no way we were staying in Palm Beach” and were headed to Twin Dolphins Marina on the Manatee River in Bradenton.

We did not have to loiter for any openings; both locks had their western gates open when we arrived, and the two bridge tenders were prompt and courteous.  At the Alva bascule bridge the attendant inquired via VHF: “Aren’t you guys headed in the wrong direction?”  We mentioned our RFYC destination and haul-out intentions and he congratulated us on a good plan.  

Waiting on the Fort Denaud Swing Bridge & Hoping it Wouldn't Get
Stuck in an Intermediate Position.
The only real angst we had was at the Fort Denaud swing bridge (9 foot clearance); that thing is ancient and rickety, and has been known to fail in the closed or partially open position….but not this time.  Even the weather cooperated, with the usual thunderstorms holding off until much later that afternoon.  And Ghost Rider ran perfectly; we even managed to squeeze in a short wide open throttle (WOT) run as we hustled to make the final lock opening at Ortona.

We didn’t even have to wait for the haul-out upon arrival at RFYC….we were directed straight into the well, got Ghost Rider all strapped in, and we were out of the water in short order.  We shut down everything – all AC and DC circuit breakers, plus the inverter.  Except for the battery monitor and a few electrical panel LEDs, Ghost Rider was electrically dead.  There would be no shore power connection, so that was necessary to preserve the house battery bank.
Ghost Rider Hauling Out at River Forest Yachting Center.

It took us about three hours to get the boat prepped after the travel lift had positioned us on their tie-down apron.  We had been through this preparation routine once before with Hurricane Irma in 2017, so we had a good checklist to follow.  We stripped canvas, lowered antennae, stowed loose items, and tied or taped anything that might move or leak.  In the 90+ degree heat it was an exhausting afternoon.  The RFYC staff placed plenty of blocks and jackstands to support the boat’s 80,000 pounds, then ratchet strapped 4 of our beefy corner cleats to their equally beefy concrete-embedded hurricane eye bolts.  We were storm ready if needed.

While there Rick sat down with John, the yard manager, and we wrote up a work order to replace or repair the two faulty seacock through-hulls we had discovered back in the spring.  We also added some remedial bottom paint work to the order – upon haul out we noticed excessive ablative wear all along the water line and some on the bulbous bow.  Below that, however, the bottom paint was in excellent shape. 
The Bottom Paint Along the Waterline was Looking Pretty Sad, Although
Below That It Still Looked Very Good.

By 1600 we called it a day.  RFYC is in the middle of nowhere, with no good transportation options available locally.  Fortunately we had dropped one of the cars at RFYC the day before (by automobile it’s only an hour’s drive from Legacy Harbour) so we weren’t stranded.  Coincidentally we had met another Nordhavn couple the day before, George and Christina, who were transient berthed at Legacy; they also took their N35, Sophie, to River Forest, so we gave them (and their cat) a lift back to Fort Myers to retrieve their rental car.

We slept like corpses that night and then spent the next few days relaxing at our Fort Myers condo while tracking Dorian’s progress (or lack of it) across western Atlantic waters.  By the time it reached the hot-tub-temperatures of Bahamian waters (Sunday, 01-Sep) it had spooled up to a Cat-5 storm with sustained winds at 185 MPH and gusts to 220, pushing a surge around 20 feet.  The Abacos and Grand Bahama – places like Hopetown, Marsh Harbor, Green Turtle Cay, West End, that we had so enjoyed during last year’s cruising – got absolutely walloped by the storm as it plowed westward, stalled, and spun a sustained and devastating attack on those small islands.
Ghost Rider at RFYC After Being Relocated to a Covered Spot on the Apron.

Dorian had slowed so dramatically that it wasn’t until Wednesday, 04-Sep that RFYC was able to start unstrapping and splashing boats.  Chelle went shopping for groceries and supplies to drop off for our area’s Bahamian relief efforts, and Rick drove back to RFYC to visit Ghost Rider and to get an estimate of how long our repair work order would take.  The boat was pretty dirty but otherwise in good shape.  Rick began reversing some of the storm preps, ventilated the engine room and got shore power hooked up (to re-charge the house batteries) after the RFYC staff relocated Ghost Rider to a work slot on the apron that was also under cover.  

Rick made one more trip back to RFYC and the boat on Friday, 06-September, to complete reversal of our storm preps and to take care of some interim maintenance to-do's that our Wheelhouse program was nagging about.  The RFYC staff indicated they intended to start on our work order the following Monday, so for now we were done with boat business.

In the interim Chelle had kept extremely busy with the storm relief efforts for the northernmost islands in the Bahamas.  In addition to her shopping trip we posted signs in our condo complex and collected more non-perishables from our neighbors.  One of our local Fort Myers boat yards, Stokes Marine (LINK), was a nearby and convenient site coordinating supplies and transport.  (Owner, Brent Stokes, was interviewed by CNN, a clip is available at the THIS LINK.)  While Rick was distracted with Ghost Rider Chelle spent more of her time helping load up trucks and boats. Their initial flotilla and private plane formation delivered a significant payload to Lucaya, Grand Bahama, today -- it's the only port capable of receiving materials at this point.  But the hope is to keep it going and include the Abacos sometime next week.

Overall they’ve done a fabulous job collecting and transporting a huge amount of critically needed supplies....pics below. Fortunately the weather was cooperating, as Dorian had sucked all the moisture out of our atmosphere like a gigantic wet-dry vacuum on its journey north.  If you want to help and are not sure how, there is a safe GoFundMe site at this LINK.  Or just head over to the Red Cross web site HERE.

Just Some of the Relief Supplies Being Collected at Stokes Marine.
Loading Up the Boats.  Some Would Sortie Across Lake O, but Many Were Trailered Over to
Fort Lauderdale and From There Headed to Lucaya, Grand Bahama.

Thursday, August 22, 2019

Aug 2019: Miscellaneous Boat Business

Looking Down Into the Bilge Cavity Which is
Just Aft of the Main Engine, with a Water Hose
Pumping Water In at a Pretty Good Clip.
The summer weather in southwest Florida is rarely an attraction, but this year it truly sucks.  A persistent westerly flow has been bringing copious amounts of moisture, so not only has it been raining every day, it has been raining all day.  And some nights.  Based on the decline of El Nino and NOAA's latest tropical storm forecast, we've calculated the rain might stop some time in November.  Ghost Rider may be our ark.

Still, even as we were enjoying the distraction and satisfaction of recently completing two special projects – for the boat’s remote monitoring and CCTV systems, see two previous blogs – we of course continued to pay attention to the periodic duties that Ghost Rider requires to stay (and keep us) happy. 

It is not normal to wake up one morning and think “let’s see if we can flood the boat today”, but that’s essentially the approach required when it’s time (annually) to test out the boat’s bilge pumps.  Ghost Rider has four of those as part of its de-watering systems.  Two are DC powered with automatic float switches: a Whale Gulper 320 for nuisance water and a Rule 3100 for high water, with 300 and 3,000 GPH ratings respectively.  A third is manually operated via a hand pump; that’s an Edson 638 with a gallon-per-stroke rating.  And the fourth is a Pacer crash pump which can evacuate up to 10,000 GPH – that’s about the volume of an average domestic in-ground pool here in south Florida – and is hydraulically powered via the PTO coming off the wing engine. 

The Hydraulic Pacer Crash Pump Located in the
Lazarette.  You Can Tell It's a Serious Pump by the
Size of the Input & Output Hoses.
After dumping a prodigious amount of fresh water into the bilge via a garden hose – about 40 gallons based on what was drawn down from our forward water tank – all  pumps were working, although Rick wasn’t particularly happy with what appeared to be intermittent suction from the big Rule 3100. He later disassembled that to check for debris clogs, but to be completely safe we ordered a new Rule 4000 GPH pump to replace it.  The big Pacer hydraulic unit required some manual priming which is normal for anything other than a full down-flooding event, but once primed it sucked out the entire bilge in a matter of seconds; that thing generates an amazing fire-hose stream of water out the back of the boat. 

And the recently installed remote sensor dutifully reported its detection of high water, but also revealed a weakness – it wouldn't dry out and kept triggering alarms.  After huddling with the vendor (Monnit) it was determined that we had a faulty unit and they shipped a replacement.  Rick fashioned a new mounting method for this one  (vertical vs. horizontal orientation, and a few inches lower) and thus far it is behaving.  To illustrate we have added a couple of updated photos of the bilge area towards the bottom of this post.

As mentioned in a previous blog we also needed to figure out what was wrong with the master stateroom's air conditioning unit, which had started throwing “HI PS” (high pressure) warnings and shutting itself down.  After a week of trying his home remedies with no resolution, Rick called an A/C tech out to the boat; when he showed up as scheduled one morning, we cranked up the air conditioning unit in the master stateroom….and it performed flawlessly.

The Sea Strainer for the A/C with a New "Hat".  Rick Ordered a Whole New Lid
with Rubber Gasket for it After Experiencing Issues with the Old Cork Gasket.
No "HI PS" errors, just a constant flow of nicely chilled air.  We had the tech (Craig, from VIP Marine, LINK) check the system for pressure, component temps and overall system health – all of which he pronounced to be sound.  Puzzlement.  Theoretically the issue could be a control board about to go bad, or an intermittently sticking pressure switch, or just a piece of flotsam that unstuck itself from the cooling loop…with the latter being the most likely and preferable.  But at any rate the problem seems to be gone.  Perhaps occasionally you just get lucky.
The "Before" and "After" Pics of an Overhead Light Bezel (Trim Ring).  It is
Not a Difficult Task to Buff Out, but There Are 40 of Them.
Moving on from that, we turned our attention to another minor item on “The List” of things to do.  This one was to replace or repair the overhead lighting trim rings that dotted the ceiling panels in the pilot house, galley, salon, and both staterooms (and heads).  The faux chrome plastic bezel rings were thoroughly pitted and turning green after 17 years of salty exposure.  

As it turns out, rubbing them down with a 3M Scotch Pad soaked with white vinegar restores them quite nicely and is a lot cheaper than buying new ones.  But there are 40 of the damned things and that took a while given the difficulty of prying them off and snapping them back on.  (After the first dozen or so we learned a useful trick: lightly coat the inside of the snap-on trim ring with Superlube synthetic grease… after which they became much easier to reinstall.)

The Pilot House Overhead Panel (Removed) Where Water Was Leaking; the Red
Arrow Points to the Sirius/XM Antenna Wire Feed That Was the Source.
Next, with the deluge of monsoon events here, we discovered a rain water leak in the pilot house.  It didn’t take long to narrow it down to the Sirius/XM satellite antenna wire where it fed through the pilot house roof.  Coincidentally the Furuno (BBWX3) weather receiver started complaining about intermittent antenna signaling, so Rick decided to just rip out the whole thing and start fresh by installing a new one, a Shakespeare SRA-50 unit.  That turned out to be a good idea as we found frayed wiring inside the old unit.  Once the new one was operational the Furuno weather receiver was back to its ops-normal happy state, and the new gasket / caulking had solved the rain water leak.
Looking at the Underside of the Old Sirius/XM Antenna, with the Red Arrow
Pointing to the Frayed (and Eventually Broken) Wire.  It Was Pretty Obvious that
a Previous Owner Had Tried to Re-caulk & Tighten with Poor Technique.
The New (and Properly Caulked) Sirius/XM Antenna on the Roof of the Pilot House.  With No Leaks.
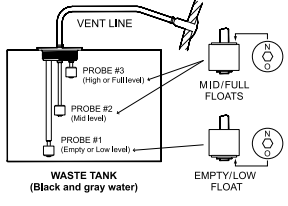
Another annual fun job that came due was to remove and clean the tank level probes for the black water holding tank.  This isn't a difficult task by any means, but it isn't a particularly pleasant one, either.  The most important tools involved are a pair of nitrile gloves for your hands and a clothespin for your nose. 
The Top of the Black Water (Waste) Tank with the Yellow Arrow Pointing to
the Tank-Level-Probe Assembly that Needs to be Removed & Cleaned Annually

The device itself is dead nuts simple, with three adjustable level floats attached to a threaded top cap, and easy to remove (after labeling and disconnecting the four lead wires.)  We then placed it into a large bag-lined bucket to (quickly) carry outside for a thorough hose down.  We had replaced the original probe assembly with a new one when we first bought the boat, so it was in pretty good shape, easy to clean, and simple to reinstall.  Rick followed up with a healthy shot of air sanitizer, also replacing the vent line charcoal filter, and those should not require attention for another year.

A Schematic of What the Float Probes Look Like Inside the Black Water Tank.  It Doesn't Take Much Imagination
to Figure Out Why They Need to be Removed and Cleaned at Periodic Intervals...Unpleasant as that May Be.
Lastly, it was obvious that Ghost Rider was in need of some TLC on its fiberglass exterior.  While the light grey hull still looked good, above the gunwales was another story.  Months of Florida sun and rain -- absent the daily chamois mopping since we were no longer living aboard -- left a lot of white fiberglass looking less than white; dirt stains were digging in.  In between rain showers we spent several days of washing with Z-Tuff, removing tougher stains with Collonite fiberglass cleaner, followed up by applications of Collonite boat wax.  In the exhausting and soupy heat of a south Florida summer it reminded us why we normally try to be elsewhere at this time of year.
Ghost Rider Looking a Bit Cleaner While Comfortably Nestled in Her Slip at Legacy Harbour in Fort Myers
Another Shot of the Bilge Cavity. All of this Gear is Located on the High Water Shelf which Sits About 13 Inches Above the Normal Bilge Level. The Black Arrow Points to the Rule High Water Pump. The White Arrow Points to the Float Switch that Activates the Pump.  The Yellow Arrow Points Out the High Water Alarm Switch (which Triggers an Ear Piercing Scream in the Pilot House.)  The Blue Arrow Points to the New (Monnit) Remote Water Sensor, which is Now Mounted Vertically on a Black Starboard Base, Extending 3 to 4 Inches Lower Than the Shelf.

Closeup. of the New (Monnit) Remote Water Sensor (White Arrow) Mounted Vertically on a Black Starboard Base (Yellow Arrow), Extending 3 to 4 Inches Lower Than the High Water Bilge Shelf, but Still 8 or 9 Inches Above Normal Water Level.
Last but Not Least....Ghost Rider Got a pair of New Stainless Arctic Tumblers Courtesy of Daughter Suzanne.
 Perfect for Goombay Ghosts!

Saturday, July 20, 2019

July 2019: More Monitoring – with CCTV

A Typical Robust Wired Closed Circuit TV (CCTV) Architecture
Having made good progress on a remote monitoring project for Ghost Rider (LINKwe had also decided to take the next logical step and pursue another significant and closely related boat project: visual monitoring via cameras in a closed circuit configuration.  (Admittedly, the words 'logical' and 'boat' don't often collide in the same sentence...indulge us on this one.)  And once again we wanted to go as wireless as possible so as to avoid tearing up the boat trying to run cables all over the place.

The most common visual monitoring objective on a vessel like Ghost Rider is to have remote but real time camera views into the engine room while underway; it’s comforting (and something of a safety factor) to be able to see what’s going on down in the engineering spaces without having to leave the pilot house helm station.  Secondarily, having some visual view of the boat on a smartphone while physically separated from the boat is a nice security complement to the remote sensor readings we had installed for battery, shore power and bilge level status.  While it would also be beneficial to have the equivalent of a “back up camera” when executing a stern-in docking maneuver, this system would not satisfy that function.  Those typically require a reverse (mirror) and wide angle orientation that require a separate and more specialized camera device.
What We Aimed to Accomplish with a Simplified Wireless CCTV System
Such CCTV systems are preferably included during the build phase of the boat – cameras can be positioned and powered as needed, and that’s the time to be routing the hard-wired cabling formerly associated with high resolution video transmissions.  But lately retrofitting such a system had been getting a good deal more practical with all the advances in wireless (Wi-Fi) security systems.  Nevertheless, achieving reliable wireless video transport with multiple sound-proofed bulkheads to penetrate and various deck levels to traverse was not necessarily a given….that would take some research and testing, and perhaps some luck.

To be clear, this was not intended to be just the popular home security doorbell camera architecture – those are typically cloud-based with a handy but very small smart phone display (think “Ring”, “Blink”, etc.) and a reliance on some external connectivity (Internet, cellular, etc.)  In subtle contrast a CCTV (closed circuit television) system relies mainly on an internal network where remote access is a nice-to-have or secondary benefit.  Our basic requirements consisted of: (1) weather resistant IP cameras connecting to the boat’s existing wireless (2.4/5.8 GHz) LAN; (2) wired (AC powered) cameras to avoid battery powered device issues; (3) cameras with decent resolution (1080P) and low-light capability; (4) at least one dedicated and integrated onboard video display; (5) NVR/DVR recording and playback; (5) optional Cloud/Internet access to captured video; and (6) a price point under $400 USD for four cameras.  Note that we did not care much about PTZ (pan, tilt & zoom) as we viewed that as an unnecessary complexity and cost based on our planned placement and usage.
The Contents of the Cromorc Wireless Camera System Package

Based on the foregoing, and after considerable time snooping options and online reviews, our initial system choice was a Cromorc™  package (LINK). It included four wireless IP bullet cameras (with AC power plugs), a 10 inch dedicated display monitor attached to a compact NVR, the latter sporting an Ethernet port for LAN connectivity plus an HDMI output for an additional display monitor.

For the trial portion of the project we started with three cameras – two in the engine room and one in the pilot house.  (This particular system supports up to eight cameras.)  Initial setup and configuration were amazingly easy….Rick just plugged in the cameras, then plugged in the NVR to its power outlet as well as to the boat’s wireless router via a Cat-5 Ethernet patch cable.  And as soon as the system was booted up it ran through an automated configuration utility requiring a few mouse clicks, and we could see all three camera displays on the included display monitor.  After testing the camera unit signals in the engine room with doors sealed and the engine running we were pretty sure we had a good solution.  Rick then added an HDMI cable connection between the NVR and the ship’s existing PC monitor for an optional (and larger) second display.
The Four Camera Display (Only Three Active)....on the Left Side of the Pic is the Ship's 17" PC Monitor,
on the Right Side is the 10" Monitor that Came with the Cromorc NVR Device.
After all that the only relatively challenging tasks started – finding good places to permanently mount the cameras and providing for their AC power cord runs.  We ended up with two cameras in the engine room along its centerline, one forward and one aft, plus another in a back corner of the pilot house.  We also tested remote camera access via the included smartphone app  and a web browser – which also worked as advertised, giving us an additional remote security tool to complement the remote sensor devices now also in place.  Rick still has to tidy up the AC power cord run for the pilot house camera, but doesn't anticipate that to take long.

Conclusion
For the $300 USD outlay (via Amazon, LINK HERE) we were quite pleased with the Cromorc wireless camera system.  Connectivity setup among the cameras and the NVR/monitor unit was dead nuts simple.  (In that regard the review at this YouTube LINK is quite accurate.) Displays were crisp (technically only 960P vs. 1080P but still quite good), including surprisingly good low-light shots in a blacked-out engine room.  And our limited testing to this point has demonstrated very good transmission signal strength using the 2.4 GHz wireless spectrum, even from deep within a sealed up engine room.
A Single Camera Display....This Low-Light Shot of a Darkened Engine Room Impressed Us With Its Clarity
Same Single Camera Display for the Forward Engine Room Camera but with Full Lighting
Other Competitors Considered
Other camera system brands were considered but they are far too numerous to list; just Google “wireless CCTV camera systems” and you’ll get the idea.  Rick had been performing online research off and on for about a year, and the number of options were - and still are - dizzying. Given the volume of competition, it’s a reasonably safe bet that some of those others might have worked nearly as well.  But given our initial success with the Cromorc system we didn't feel compelled to find out.
The Red Arrow Points to the Aft Mounted Engine Room
Camera, the Black Arrow to the One in the Front.
What's Next
Mounting the fourth camera - if and when we determine a good location for it - will be an entirely separate project. Having a spare camera on hand isn't a bad idea, either (although you can buy more if needed at around $50 USD per camera.) But longevity and durability will take more time to ascertain. 

Thus far we've only performed limited testing of the system's recording and playback capability with its included terabyte hard drive, but that looks promising so far.  It records everything by default, but that is easy enough to modify or just disable depending on your preferences.  The system also supports motion detection recording and alerts, and we proved that works, too, although we need to get educated on the best way to configure that.  While you have very granular control on when the camera records based on motion, the alerting function (via email over a Wi-Fi Internet connection) is either always-off or always-on....making it very easy to spam yourself.

Some Screen Shots
Here are some application screen shots for accessing the boat's cameras remotely, both from the  web portal as well as the included smart phone app.
This is the Browser-Based Portal for the Camera System Although It Seems to Run Only in IE & is a Bit Buggy.  Better
to Use the Included Smart Phone App (See Below.)  The Top Two Views Are in a Completely Dark Engine Room.
An Android Smart Phone App Screen Shot.  Best Used When You Have
WiFi Access, But Does Work Via Cellular Data if You Don't Mind
the Rather Significant Data Plan Usage.
Another Android Smart Phone App Screen Shot
And Another Full Screen Shot from the Pilot House Camera via the Phone App
A Screen Capture of What the "Motion Detection Alert" Email Looks Like When We Set That Up for the Pilot House.
It Appeared to Be a Little Too Sensitive on Default Settings. That Feature Will Require Further Tweaks & Testing.

Friday, July 12, 2019

Jun-Jul 2019: A Boat Monitoring Project

There is an old theorem in the yacht ownership universe ("yacht" being code for an over-complicated boat) that has several nuanced variations, but each version generally goes something like this:
  • Q: How do you become a millionaire? 
  • A: Start out as a billionaire and then buy a boat. 
So in that spirit, here’s another installment in what seems to be a continuing series of how to spend money on boating without (currently at least) doing much boating.

The Match-box Sized Trackimo Device Locates Ghost Rider on a 24-by-7
Basis via Cellular & GPS Triangulation & Until Now Has Been the Only
"Monitoring" Device Aboard the Boat.
As mentioned in a previous blog post, we had decided to pursue a remote boat monitoring solution for Ghost Rider.  Up until this year we had spent most of our time aboard, and any short separations were mostly when the boat was on the hard for maintenance. So this hadn’t been a priority until very recently when medical issues grounded us for a spell. While we had already installed a GPS locating device  with geo-fencing capabilities (Trackimo, which is similar to a LoJack device), and it gave us and the insurance company a certain level of comfort, more was needed.

Our objectives for a remote monitoring system had now gone beyond just knowing the boat still remained where we left it.  While there are other sensors we might add once we proved out the chosen system, initially we wanted to know about these high priority items when away from the boat: (1) house battery voltage; (2) shore power connection status; and (3) bilge water level.  Likewise, when any measurement varied from a defined allowable range, we wanted to be immediately notified via email or SMS text message so that intervention, troubleshooting and remediation could begin sooner rather than later.  

The “why” behind all of this is pretty straightforward – for instance, letting a house battery bank deplete to too low of a charge level (due to loss of shore power or a charger failure) could cost us around $5,000 USD for six new 8D AGM batteries.  Similarly, rising water levels in the bilge cavity could indicate seawater intrusion (say, from a failed thru-hull), something with which we have some nasty and expensive experience.  An early alert system of some sort would be much more cost effective than just crossing our fingers and hoping for the best.  Obtaining a truly decent ROI on any boat project is about as rare as an honest politician, so if we could actually find one then  it merited pursuit.
Our Initial Monnit Purchase: Two Remote Voltage Sensors, Plus the Cellular
Gateway Pictured with its Removable Antennae and Power Plug. After
Initial Testing We Added Two More Sensors.
Our system requirements included (1) a modular system where sensors could be added when/as needed; (2) a 4G LTE cellular gateway transmitter with its own SIM card to send notifications (U.S. based would be OK for now); (3) completely wireless sensors, preferably talking to the gateway in the 900 MHz radio frequency band for reliable wireless signal range; (4) a wide selection of said sensors for both current requirements and future expansion; (5) web-based and smart phone user interfaces for system administration and sensor reading access; (6)  a price point that provides a reasonable ROI….preferably under $1,000 (USD) for equipment outlay plus low-to-no subscription fees; and (7) a track record of quality and reliability, with decent online support.

Our 4G connectivity and wireless sensor requirements eliminated well over half of the potential field, leaving only a couple of contenders.  And a few more were priced in the “marine tradition” – i.e., if intended for a boat it must be unreasonably expensive.  We finally settled on a brand called Monnit™ (LINK), which oddly enough does not advertise its system for marine / vessel use, but boasts a fairly robust industry footprint among food services, data centers and general facility management.  We were also hopeful their client landscape would lend some staying power vs. some of the specialty (and over-priced) marine monitor systems that have flamed out or fallen behind the tech curve in recent years.
After Testing of the Voltage Sensors We Then Ordered a Water
Level Sensor for the Bilge

We were concerned most of all with the effective range of any water detection sensor in the bilge cavity, since that is deep within the bowels of the boat and closed off by a very well insulated engine room. Bench-testing the Monnit equipment back at the condo over 75’ distances and using closed metal closet doors had produced good results, and we weren't disappointed when it came to the real world install on the boat. The sensor transmission strength signals remained strong regardless of where we stuck the things.

Observations, Challenges & Concerns
Setting up the Monnit Gateway device was easy and straightforward, as was registering each of the individual wireless monitors so that they became part of the desired monitoring network. The same was true for defining allowable measurement ranges and monitoring intervals.  The browser-based configuration and reporting utility takes some getting used to, but with some practice it didn't take long to learn how to navigate and use it for system administration.  

Mounting and wiring each of the monitors was also fairly straightforward, although the one for the shore power tap required considerable sleuthing with the multimeter for a good tap-in location; and Rick had to attach (crimp and heat shrink) ring leads to the bare wire ends of the battery voltage monitor.  As an aside, monitoring for shore power presence wasn't exactly intuitive....see the "caveat" further down in this blog post.

The Yellow Arrow Points to the Installed House Battery Bank Sensor (in the
Lazarette) Which is Connected to the Positive & Negative Posts
 (Red & Black Arrows) of the Last Battery of the Six  in that Battery Bank.
The biggest concern going forward will be the sensor durability in the hot and humid marine environment in SW Florida, where salt-laden air could eventually affect any of the devices over time. The gateway won’t be of particular concern as it lives in the protected pilot house. The bilge sensor should fare OK as the sensor’s PCB and antenna are several feet above the actual water pickup sensor, and the engine room tends to be a hot, dry place anyway. The house batt and shore power sensors in the lazarette will likely have the most continuous exposure to the salt air, although their locations are protected from direct water sprays.  

As an aside, we corresponded with the Monnit engineers on applying a thin coat of CRC Corrosion Block to the sensors, but they weren’t crazy about that idea.  It also turns out they now have “Industrial” grade sensors with IP65 ratings which could likely last a good deal longer in the marine environment.  We’d recommend (as do the Monnit engineers) that more expensive option if just starting out, but see pricing comments below.   

It's also worth noting here that Monnit currently has two versions (what they call gen1 and gen2) of each sensor and you cannot mix and match them.  We went with the gen2 versions branded as "Alta" since they boast  improved circuitry and greater wireless range.   The other unknown is sensor battery life - these use a 3V coin battery advertised for an average of two years of longevity, but only time will tell.
The Shore Power Monitor (Yellow Arrow) Back
in the Lazarette, Where We Tapped into 
the Inverter (Red Arrow)

Conclusions
Overall our Monnit system has worked as desired and planned thus far.  We will want to figure out how to easily pause the monitoring network when it’s not needed (e.g., while cruising and living aboard) so that we don’t unnecessarily eat batteries, but that's a nit.  We’ll probably add some startup and shutdown actions to our existing departure and arrival checklists.  The web-based and smart phone remote access portals are also very good - see the screen captures at the end of the blog entry for some samples.

We also added a fourth sensor for the boat's cabin temperature, figuring it would be helpful to know if the air conditioning system takes a dive even if everything else is humming along nicely.  And for reference the whole thing still came in around $700 USD.  Using the aforementioned “Industrial” grade sensors, which probably (in hindsight) would have been a better idea, would add a premium to each sensor, so the total price tag would be closer to our magic $1,000 threshold, especially once tax and shipping fees are factored in.  Also note the industrial versions use a Tadiran lithium battery which cost four times what a coin cell battery does, but theoretically also last four times longer.

Some other notes on subscription fees and cellular communications:  With the Monnit system the standard sensor heartbeat interval is 120 minutes with sensor readings at 20 minute intervals (6 per heartbeat span) and typically should be sufficient.  There is a $10 per month data subscription fee for usage up to 1 MB, but there are no other extra fees unless you exceed  that 1 MB of gateway data ($5 for another MB, then $3 per MB thereafter.)  Generally that shouldn’t happen unless you let a sensor alarm keep triggering without intervention (which we discovered when testing the SMS and Email notifications.) 

If shorter / faster “heartbeat” intervals are desired then the “Premier” service subscription at an additional $39 per year may make more sense but is still a reasonable price; that also provides a host of other more advanced functions which may or may not be of interest.  As for the cellular portion, the chosen Monnit gateway uses an AT&T or Verizon SIM card, so it's fine for the U.S. where those carriers' coverage is decent.  Other options exist (Ethernet or custom SIM gateways) so we suspect the Monnit solution would work elsewhere.

The Temperature Sensor Tucked Away in the Port Aft
Corner of the Pilot House
A final procurement note:  for anyone interested in pursuing this solution, when you buy from Monnit you are buying direct from the manufacturer of the devices; that means when you order sensors they need some time (about 7 to 10 days in our experience) to actually build  and ship them….they don’t carry inventory.  That said, their online (email) and telephone support is excellent.

There is another and nearly identical purchasing option at the "My BoatStatus" web site (see links below), a company who also source their devices from Monnit; they do carry inventory, but there you will find some price markups vs. the Monnit direct pricing.  Other brands that were considered are listed near the bottom of this blog entry along with their associated web site links.

We’ll provide periodic updates on the system’s reliability and durability, but for now we are quite pleased with the result, and are calling the project a success.

Caveats on Shore Power Monitoring
Wiring up this particular voltage monitor was a challenge, as how and where to monitor the AC voltage coming in from the shore power pedestal isn’t exactly obvious...at least it wasn't to Rick.  This is partially due to Rick's grade school level of electrical expertise, but also to how the boat’s charger/inverter unit works. 

When our (Xantrex) inverter is online and senses the presence of shore power current it simply goes into a pass-through mode and sends that power current to the boat’s AC distribution panel.  But if/when shore power is interrupted it will automatically and immediately go into its inverter mode and start generating ("inverting") 120 VAC power from the 12 volt house battery bank, and pass that power to the AC panel.  So monitoring for the presence of AC power downstream of the inverter unit is not particularly beneficial for this purpose.  (You can put the inverter in “bypass” mode but you would have to accept that a loss of shore power would result in an electrically dead boat….that would be OK if you planned for an extended layup but otherwise would be problematic.) 
The (Bilge) Water Sensor....Red Arrow Points to the Actual
Water Sensor Pickup (Mounted on the Shelf for the High Water
Bilge Pump).  Yellow Arrow Points to the Sensor Housing
and its Antenna Mounted a Couple Feet Above the Pickup.
This is in the Engine Room Just Aft of the Main Engine,

One could also place the voltage monitor tap at a constantly powered 240 VAC circuit or outlet (the inverter only provides 120 VAC, the 240 VAC juice has to come from either shore power or the generator), but that’s not as easy as it sounds, at least not on Ghost Rider.  The other alternative we eventually figured out was to just tap into the AC lines coming into the inverter, which is what we ultimately did.  That tap is only on one of the two incoming 120V shore power legs, but that's sufficient for our purposes.

Other Competitors Considered
Other solutions considered but not pursued further include those listed below.  There are probably others out there.  Several of these also include the GPS location and geo-fencing service within their monitoring solution, which we already had installed via Trackimo and did not want to replicate:

➢ Boat Command….requires running wired cabling (LINK)
 Boat Nanny….acquired by GOST
 Go Free marine…. requires running wired cabling (LINK)
 GOST….way too pricey for us (LINK)
 Kobelt….very sophisticated, requires N2K, could not find pricing (LINK)
 Maretron….requires N2K wire runs, also quite pricey* (LINK)
 Mazu Marine….satellite based, hefty subscription, but works anywhere (LINK)
 My Boat Status….uses Monnit-supplied devices, too, but with price markups (LINK)
➢ Simrad BoatConnect....also requires running wired cabling (LINK)
 Siren Marine….their wireless version is fairly new, good reviews, but pricier (LINK)

(* If you're already a Maretron user this "pricey" comment may not apply and would be worth evaluating further.)

What’s Next
Oh yes indeed, Rick already has another boat project in mind….this one to find a CCTV camera solution for visual monitoring of certain conditions / areas.  Once again the desire is to find a mostly wireless solution to avoid tearing the boat apart to run cabling.  It should be an interesting exercise.

Some Screen Shots
Here are some application screen shots, both from the iMonnit web portal as well as the included smart phone app.  (Side note: their web portal sports two user interface experiences....Rick tends to favor the older "classic" look, but that's highly subjective.)  At any rate, these are just a small subset of what's available:
Screen Shot of the List of Notifications (Event Triggers) Defined for the Four Sensors and
Gateway Device...from the iMonnit Web Portal

Screen Shot of Shore Power Sensor Readings from the iMonnit Web Portal
Screen Shot of House Battery Bank Sensor Readings from the iMonnit Web Portal
Another Screen Shot Demonstrating the Graph Depiction of the House Battery Readings...That Spike is During a
"Bulk Charge" Period.  And Yes, These Are Obviously Temperature-Compensated Voltage Readings.  It's HOT Here.

An Android Smart Phone App Screen Shot.....This Example
Showing House Battery Bank Sensor Readings
Another Android Smart Phone App Screen Shot.....This One Showing Graph & Sensor 
Readings for the Shore Power Monitor