Sunday, August 30, 2020

August 2020: Humility, Health & Hurricanes

Foreword:  We continue to remain cautious with our Covid protocols and healthy as well, and hope the same is true for all y'all.  We know some others are not so lucky.  And we remind ourselves that students are called students because they still have a lot to learn – including basic common sense.  Our youth have an excuse for their occasional incompetence and idiocy.  The rest of us do not.  

There’s nothing quite like a boat project (or two) to occasionally remind you that you’re not near as handy as you previously thought.  Or, perhaps, once were.  If you ever wonder why some vessel owners can seem rather humble at times, there is likely a causal connection to some boat project.  But since humility is a healthy sign of emotional maturity, we're OK with that.

Keeping ourselves and Ghost Rider healthy and happy while (still) confined to port was the main goal for August, mainly to be able to move to our RFYC hurricane hole should the tropical weather patterns call for that.  The official tropical forecast from the weather-guessers had just recently increased the expected number of named storms to 24 (yikes) and the expected hurricane count to 12 – which basically gave us the distinct potential for the equivalent of two full storm seasons packed into one. 
Secondary goals included getting the dinghy davit (crane) back in operation and completing the Racor fuel filter conversions.  But neither of those was going very smoothly.

Break/Fix (Davit Update)

Both Ross (of Classic Marine) and Rick had been active in the hunt for replacement parts, mainly for the corroded hydraulic reservoir tank.  As it turns out, the hydraulic pump, motor and manifold assembly, which were theoretically still serviceable, have to be matched to the opening fitment on the reservoir, which was most certainly not serviceable, nor recoverable. 
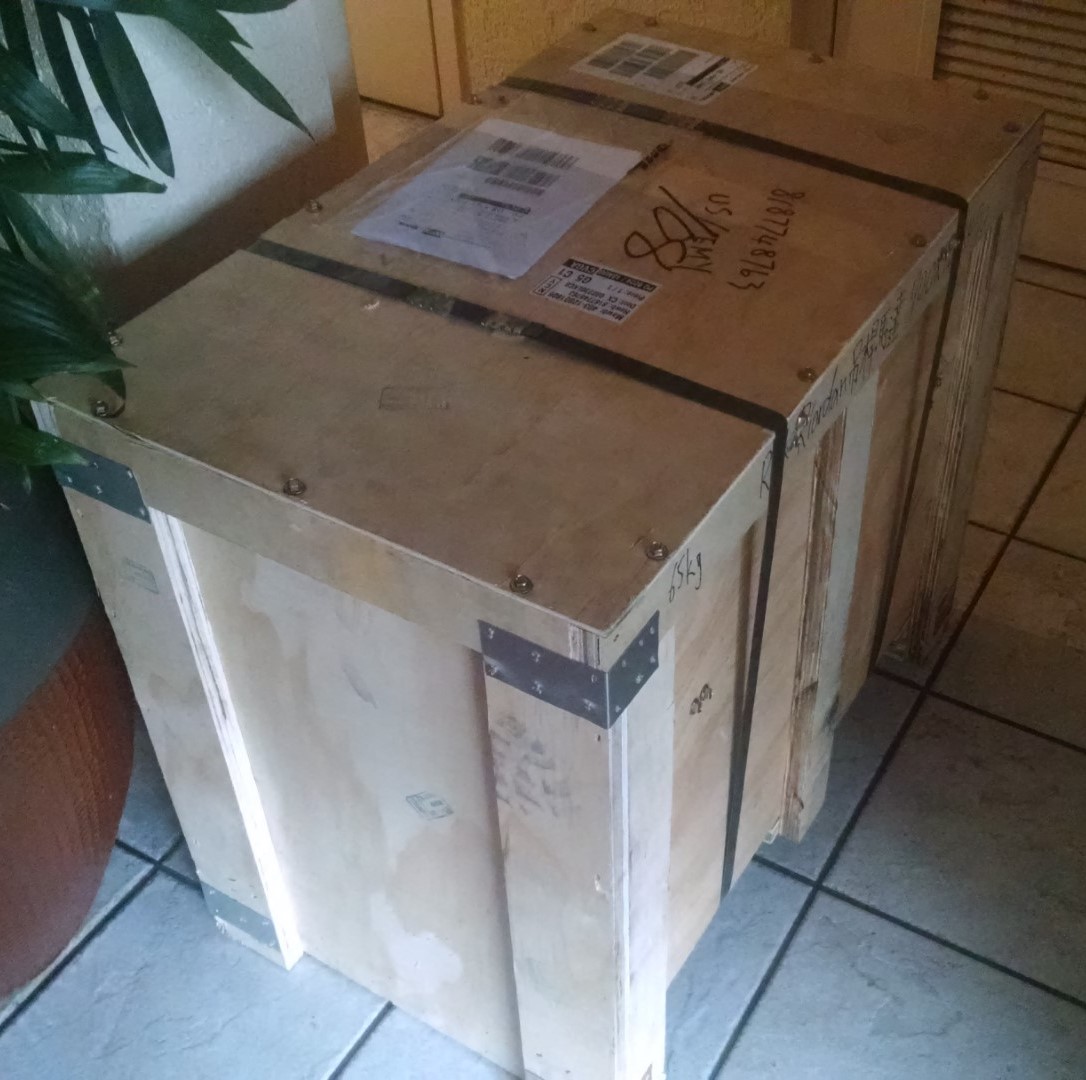
The Crate Containing the New HPU for the Davit
Was a Work of Art
Basically that meant they had to be matched and replaced together as what’s known as an HPU, or hydraulic power unit.  Ross had found a potential third party source, but wasn’t certain it would fit in the limited space we had available in the base of the crane.  Rick had contacted the manufacturer, Aritex, located in Taiwan, and they committed to providing a factory original HPU for two and a half Boat Units….plus $500 USD shipping via DHL air freight.  And that’s the option we took.  (If you’re curious, a whole new hydraulic crane of similar capacity runs in the neighborhood of 20 Boat Units.)

The new HPU did not arrive here in the USA until 19-August, with the crate weighing in at 65 kilograms (143 pounds), and it took Rick 45 minutes to remove the 30 rather beefy wood screws securing the top and four cross members that secured the cargo inside.  Overall measurements of the new HPU matched up favorably with the old parts, but that’s where the similarities ended.  The motor was actually bigger, the hydraulic manifold was mounted in a different location, and electrical connections were lacking.  Ross took it to his shop where a lot of surgery is currently in progress to see if we can make it work.
The New HPU (Tank, Manifold, Valves & Motor) for the Davit
Project Work

Our little “Racor conversion” project by now had morphed into something a bit more involved than originally anticipated.  After installing the fire deflector on the wing engine’s primary filter, we did the same for the transfer pump filter.  But after a couple days that one developed a slow leak.  Out of an abundance of caution Rick decided to replace all the remaining fuel bowls – after 18 years they were quite discolored – but in the end the real key was to not over-torque the brass nut securing the heat deflector shield to the plastic bowl...which would deform the sealing o-ring and allow fuel seepage.
Rick Saved the Racor Conversion for the Genset for
Last...It Had to be Completely Removed from the Fuel
Lines & Bulkhead (Yellow Arrow) & then Disassembled
(Red Arrow) to be Converted.
In the process we had also found that three of our filter brackets required adding a 5/8” starboard backing plate to provide enough room for the increased diameter of the heat deflectors.  Rick also had to remove and relocate two “Algae-X” filters for the wing engine and generator.  There was some added frustration after discovering some of the Racor parts kits were missing o-rings or washers, installation instructions on washer sequence sometimes differed between parts kits, and at least one of the brass nuts used to attach the deflector to the fuel bowl was threaded for the old-style bowls from the 1990’s.

Eventually we got it all figured out and corrected.  We sourced most major parts from the Racor Store (LINK), but also tried Discount Racor (LINK), although they were painfully slow, delivered the wrong part, and we saw nothing resembling a discount from them. As mentioned in our previous post we sourced the UL rated brass draincocks and plugs from McMaster-Carr (LINK), and in contrast they were very prompt, and all of their stuff fit correctly.  As an extra precaution Rick applied Loctite 565 to the male threads of those draincocks during assembly, but that was likely overkill given their NPTF threads.

It took a lot longer than expected, but it was very satisfying to have converted the five Racor secondary fuel filters to a much safer, fire-tolerant configuration.
The Final Result -- All Five Racors Converted with Fire Protection Deflector Shields with Brass Draincocks & Plugs
And An “Aw Shit” Event

Lastly, Rick managed to create a new maintenance opportunity during what should have been a routine activity….cleaning the A/C strainer basket.  But after removing said basket and while cleaning it dockside with a high pressure water hose, he lost his grip on it and the power of the water stream shot the thing off the dock like it was a Roman candle.  And straight into the marina basin.  He verified stainless steel strainer baskets do not float, and that we had no spare on board.
This is the Stainless Steel Strainer Basket for the A/C
that Took a Dip in the Marina.  Based on What West
Marine Charges for One, It Belongs in a Bank Safe.

We did not want the boat to be without air conditioning in the stifling Florida humidity for the several days it would take a reasonably priced replacement to arrive.  So Rick found an overpriced one at the nearby West Marine and got the system back in operation the same day.  About a week later when the diver showed up for Ghost Rider’s monthly below-the-waterline cleaning, Rick asked him to scour the silty bottom, and he did manage to retrieve the wayward strainer basket.  So now we have a spare.

And Then There Was the Weather

The first half of August was just the typical hot, humid and stormy stuff in south Florida.  But the second half got more interesting.  By 19-August the NHC was tracking the next two systems, one in the western Caribbean (which would eventually become TS Marco) and another in the western Atlantic (and would be dubbed Hurricane Laura.)  While the former was not a factor for us, the latter was initially forecast to take direct aim at our area, and potentially at hurricane strength. 
The Original Forecast Track for Laura Was....Concerning

River Forest (our hurricane hidey hole) gave us some pretty short notice on a narrow arrival window; we decided against moving the boat there for a variety of reasons, not the least of which was low confidence in any of the early model calculations.  It was becoming clear that even the best of the predictive weather models were not dealing well with the changing climate conditions.  But we added extra lines and fenders to Ghost Rider just in case and kept careful watch on the evolving forecast.

Eventually the Tracks for Both Marco & Laura Shifted Well to Our West
Luckily (for us anyway) over time the predicted and actual path of Laura increasingly shifted to the south and west, eventually missing us by a full 500 miles.  The northwest Gulf coast was not so lucky, as the hurricane made landfall at Cameron, LA as a Category 4 storm packing 150 MPH winds and pushing 12 feet of storm surge in spots.

We’re now halfway through the tropical storm season, with only three months to go.  Stay tuned, we're sure as hell paying attention.

Ultimately Hurricane Laura Spooled Up to a Cat-4 Storm & Clobbered Louisiana on 27-August
....
After Laura Departed Four More Areas of Potential Development Appeared.  Long Way to Go in This Season....
....

Saturday, August 1, 2020

July 2020: More Maintenance & Projects

Foreword:  We’re still observing our healthful Covid protocols and staying safe, although here in Florida a lot of folks seem intent on making that increasingly difficult.  Hurricane Isaias isn’t helping any, although thankfully we are not directly impacted by that.  

The Aeroshell Aerobatic Team Flies Their AT-6 Texans with Beautiful Precision
Apart from trying to keep the boat clean, keeping up with routine maintenance, and occasionally exercising engines and systems, our focus this month has been trying to find a fix for the busted crane up on the boat deck.  But first we’re going to back up and start at the beginning of the month.

Independence Day!

As a three generation military family every July 4th we appreciate and enjoy our Independence Day celebration.  It’s a fabulous USA holiday that celebrates the beginning of a marvelous experiment, albeit one in some jeopardy these days.  We flew Old Glory both at the condo and the boat all day, and respectfully retired the colors at sunset.  In between we made sure we were at the marina to witness the celebratory flyover by the Aeroshell Aerobatic Team (LINK), in their precision fourship formation of AT-6 Texans directly over Ghost Rider. That vintage WWII aircraft (in service since 1938) is the one in which Rick’s father learned to fly back in the early ‘40’s before deploying to the Pacific Theater….and deserves its own salute.  Short amateurish video below.


Regular Maintenance

A few days later it was time for our periodic “running of the diesels”, normally not a routine with which we need to be concerned, but which is worth mentioning during a time when so many boats and boaters (like us) are stuck in port.  While Nordhavn vessels and their Lugger diesels have proven to be largely indestructible, our goal is to minimize the expensive service opportunities along the way.  Keeping systems exercised helps with that.

Just running an engine for a few minutes does more harm than good – failing to bring it all the way to the normal operating temperature range will just promote internal condensation, corrosion and the early demise of both coolant and oil.  In reality that requires running them for at least 30 to 45 minutes, and where possible under load.  

The Genset Instrument Cluster, with the Yellow Arrow Highlighting the Much
Too High Temperature Gauge Reading of 210F
That means activating as many engine-driven systems as possible and exercising them as well.  For the main engine that includes the stabilizers and alternators, as well as bumping into gear for working the transmission and packing gland.  (You want to be double-tied to very sturdy dock cleats for this part.)  For the wing engine that entails running the hydraulic thrusters.  And for the generator we disconnect from shore power and run full electrical loads.  Finally, the steering system – helm pumps, steering ram and autopilot pump – all get a short workout, too.

Break/Fix Opportunities

During the generator exercise period we noticed its coolant temperature gauge was reading high – up to 210F, well above its optimum target of 185F (its thermostat opens at 180F).  Shooting the engine’s coolant expansion tank with the infrared temperature gun confirmed that it was indeed running at normal temp, so we knew we had some sort of gauge issue and not an actual mechanical problem.  (The genset also has an internal fail safe switch that automatically shuts down the unit at 205F.)  It was time for some sleuthing.
The Back End of the Generator Where the Ground Wires Terminate.  Yellow
Arrow Indicates Gauge Grounding Bolt, Green is for the Bonding Wires.

We had learned from the Nordy owners forum that this wasn’t a particularly unusual problem, and that just replacing the gauge rarely if ever resolved the problem.  While the sending unit was a possibility, that wasn’t likely either – when that goes wonky, it’s usually a total failure.  It was much more probable that one or more ground wires on the engine needed attention, and in the end that proved true in this case.  On our L843 (12 KW) generator Rick eventually located two 10MM bolts securing a total of three grounding wires plus three other bonding wire straps at the junction box bracket.  Disassembling those and then thoroughly cleaning, sanding/filing, and then coating the ring terminals with dielectric grease before reassembling did the trick.  Rick also rearranged them a bit to isolate the smaller grounding wires from the larger bonding straps.
The Genset Instrument Cluster, with the Yellow Arrow Now Highlighting
the Improved 
Temperature Gauge Reading of 190F Following Ground
Wire Removal, Cleanup & Reattachment.

The genset’s temp gauge still reads slightly high compared to the IR gun reading, but knowing that analog gauges aren’t particularly accurate in the first place, we can live with it.  (This is the reason that in most cars you now mostly see either “idiot lights” instead of gauges, or at best their gauges have rather wide pointer ranges in between “low” and “high” pegs at the extremes.  The gauges with precise graduations are rarely better than false advertising, better to treat them as trending indicators.)

Now, about that busted crane.  At the end of last month’s blog post we mentioned that our Aritex HSC-610 davit had developed an onerous problem – we traced a nasty hydraulic fluid leak to a corroded reservoir tank in the base of the unit.  Rick subsequently determined that it was likely electrically related (electrolytic) corrosion….the green bonding strap attached to the metal tank was carrying voltage and current according to the multimeter, and that’s a problem. Rick pumped remaining hydraulic fluid out of the tank, then spent a few afternoons reviewing manuals (which were mostly useless) and trying to discern how to dismantle and extract the tank, motor, manifold and control box; but without much success.

The Crane's Hydraulic Motor and Tank Reservoir After Removal
From Inside the Base.  It Was Tight Quarters.
We learned from the marina office that Ross at nearby Classic Marine (who had very capably handled our electronic throttle replacement last year) was experienced with hydraulic cranes and davits, so we invited him out to the boat for a look.  He dug right in and had the motor & tank assembly removed and on its way to his shop after about two hours of sweaty persistence.

We’re not exactly sure what the ultimate resolution may be, or when.  For now Ross has agreed to work it in to his busy schedule, but thus far hasn’t had any luck locating compatible replacement parts.  So we’re trying to look at the bright side: at least it didn’t expire while we were trying to launch or retrieve the dinghy.  We still have no idea what we would do about a crane failure with a 450 pound rigid inflatable suspended from it, especially at some remote anchorage.

Project Work

The next “future project” to bubble to the top of the list was to upgrade the boat’s five Racor fuel filter assemblies.  Ghost Rider was originally built at a time that preceded today’s ABYC and US Coast Guard standards for fire protection, which now specify filter housings must either be all metallic, or the clear plastic ones should be protected by metallic heat deflectors. The objective is to make them survivable for a minimum of 2 ½ minutes in the event of an engine room fire, giving the fire suppression system time to do its thing before a breached (melted) filter could dump a full fuel tank into the blaze.  There’s a good explanatory article HERE from Passagemaker.com.
In the Background is the Generator's Racor with
Its Exposed Plastic Bowl & Plastic Drain (Yellow
Arrow).  In the Foreground is the Converted Wing
Engine Racor with Metallic Deflector (Red Arrow)
& UL Listed Brass Draincock (Black Arrow).

Rick’s goal was to retrofit the Racor “MA” series of heat deflectors to our old “FG” series of filters.  On the surface that appeared straightforward and less pricey than buying five new primary fuel filters.  And, as usual, the reality turned out to be a bit different.  Research revealed that the Racor fuel bowl design was changed in the 2002-2003 timeframe (when Ghost Rider was built), and the older model bowls are not compatible with the MA heat deflector kits; there could be differences both in thread sizes as well as the o-ring gland required to properly seal the bowl’s new brass plug.  But the only way to tell was to drain the bowl and remove the old plastic plug.

Rick used one of the smaller 500FG filters (for the wing engine) as an initial test, ordering the heat deflector kit and a new bowl out of an abundance of caution.  As it turned out the new bowl wasn’t needed, but Rick swapped it out anyway.  He also had to remove the fuel lines, move an Algae-X filtering device, and add spacers between the filter housing the engine room bulkhead to create enough room for the deflector shield…so it was a bit more involved than originally anticipated.  Typical boat project.  
Removing & Replacing the Fuel Bowl on These Older
Models is No Fun...the Upper Turbine Assembly Has
to be Disassembled to Get That Done.

Finally, Rick also added a brass on/off fuel valve (draincock), replacing the standard bowl plug, to make future draining both easier and less messy.  To maintain conformance with ABYC fire standards that valve not only had to be metallic, but also could turn no more and no less than 90 degrees, could not rely on any spring tension for leak integrity, and also had to have its own plug as an additional measure against leaks. 

We used the Racor Store (LINK) for the deflector kits and bowl, and McMaster-Carr (LINK) for sourcing the UL Listed fuel valves.  After running the wing engine for a spell and thorough leak-testing over a few days we declared victory for the initial test.  Rick proceeded to convert the bigger 900FG Racor for the fuel transfer (polishing) system as a second test and that, too, ended well.

In our August blog post we’ll report on the efforts to convert the remaining three Racor filters (the two 900’s for the main engine, and the other 500 for the generator.)  And hopefully by then we’ll have a better idea on next steps for the boat crane.
Next Month We'll Get the Conversion Done for the Main Engine's Dual Racors (Far Left) and for the Generator (Far Right).
The Latter Won't be Fun Because of the Algae-X Filter Below & Behind It.
 Afterword:  We can't tell which disease is more dangerous, Covid-19 or Utter Stupidity.  Either way, we have plenty of both down here.  Back in March we accurately predicted the havoc that results from a leadership vacuum, but it seems we underestimated the additive impact of sociopathic idiocy.  Historians won’t be kind, and neither will our future generations.

Hurricane Isaias Stayed Off to Our East.  Only Four More Months Remain in the "Season".

Wednesday, July 1, 2020

June 2020: Routine Maintenance (Mostly)

Foreword:  We’re still hanging out in Fort Myers and still mostly lying low, trying to avoid the unmasked morons when we do get out.  As social unrest and outrage gets layered on top of a pandemic, the pandemonium amplifies.  And just when we thought federal & state governments couldn’t possibly get any more abject & inept, they managed to prove us wrong.  It’s like someone combined 1918 with 1968 and then put the inmates in charge of the asylum.  But as we predicted back in March, that's what happens in leadership vacuums.

The same caveat that led off last month's blog entry applies this month as well...it's all about upkeep and projects -- of interest only to boat geeks and perhaps some gearheads with time on their hands.  We've had no problem keeping busily occupied.

Regular Maintenance
The Main Engine's ZF Transmission with Dipstick and Fill Plug Removed,
Ready to be Drained.
First up was an oil and filter change for the transmission on the main engine.  The book says that comes due at 1,000 hours of run time or annually, whichever comes first.  We were nowhere close to the run time threshold, but it had been about a year, so it was time.  But thanks to the Reverso electric oil change pump and the way Nordhavn plumbed that, this is a pretty straightforward operation.  You do have to move a two-way valve on the main engine to direct the Reverso plumbing to the tranny (rather than the engine’s oil sump), but after that it only takes a few minutes to pump out the old oil.

While the ops manual for the ZF 280 transmission states oil capacity is 1.3 gallons we actually pumped out 1.5 gallons….that’s because on a continuous-duty diesel engine (in this case our Lugger 6108) there is a transmission oil cooler tucked under the usual heat exchanger and that additional plumbing requires additional oil capacity.  Rick wasn’t sure when the transmission’s filter screen was last removed for cleaning, so to be safe he purchased a new one and installed that before refilling with new oil.  The old one, however, looked almost pristine, so it went into the spare parts bin.
New & Old Tranny Oil Screens on the Left; It
Takes a Big Socket to Remove & Install.
We use straight 40W Shell Rotella T-1 motor oil for the ZF tranny (30W is an option for cooler climates) to stay compliant with manufacturer specifications.  While the Reverso system is capable of adding as well as extracting oil, Rick prefers to add oil manually through the standard oil fill port using a funnel….using the same Reverso hose that drains the unit might reintroduce used oil contaminants, so why chance that?

Verifying that you’ve added enough new oil back into the tranny isn’t exactly intuitive, however – the dipstick markings are calibrated without regard for the additional oil capacity that the oil cooler plumbing requires.  Thus one has to start the engine, pop the throttle handle briefly into forward and reverse to circulate the oil, shut down, and then within 60 seconds or less return to the engine room to check the oil level on the dipstick – before the oil cooler lines can drain back into the tranny, and that level should be at the normal “full” mark.  When checking the transmission oil level on a cold engine that’s been sitting it should actually be above that full mark, and it’s wise to note that level on the dipstick.

The Transmission Oil Cooler (Yellow Arrow) and the Two Oil
Cooler Hoses (Red Arrows).
Shortly after the tranny oil change trigger fired in our Wheelhouse software, so did the one for the wing engine – same deal, an annual reminder.  Any oil, regardless of quality or composition, has a finite shelf life….inside an engine (or an open container for that matter) the oil begins to lose its key lubricating and protection properties at about the one year mark, regardless of engine runtime hours.  Theoretically, at least, one could take an oil sample and have it lab tested for efficacy, and extend that interval given positive test results.  (And actually that’s a good idea at certain intervals anyway, since such a lab test can detect chemicals and elements that may portend internal wear issues.)  The problem, however, is you really don’t know for how much longer that oil with retain its protective properties…unless you keep testing it.  In the end, an oil and filter change is cheaper, easier and more reliable.  Why risk equipment that (depending on which engine) costs between $25,000 and $40,000 for the nominal costs of some oil and a filter?
Oil Change on the L984 Wing Engine; the
Yellow Arrow Points to the Oil Filter.

Once again the Reverso oil change pump made this a fairly simple task….flip a couple of switches, pump the old oil into a couple of empty containers, drop the old oil filter into a baggie, grab a new filter and spin it on, then add 9.5 quarts of Delo 10W-40 into the Lugger 984.  Done….all of that takes only 15 minutes.  Then there’s another 15 minutes for cleanup and disposal.

Project Work
Next up was a small project that had been on the “eventually” list for quite some time: to replace Ghost Rider’s anchor light with an LED bulb.  The reason is simple – in more normal times Nordhavns tend to spend a lot of time at anchor running on battery power only, and from sunset to sunrise the anchor light must be illuminated.  The LED bulb should last longer, draw a lot less battery juice and theoretically also be brighter than the standard incandescent bulb.  Unfortunately this project requires climbing on top of the radar arch and balancing there with one hand while using the other for disassembling the housing and swapping bulbs.  The trick is to buy a quality LED (we chose the “Dr. LED” brand on Defender), then pick a calm day, bring a ladder to minimize pulled muscles, and then proceed slowly and deliberately. Rick managed to pull it off without getting dizzy or falling.

The anchor light on Ghost Rider (red circle) is approximately 22 feet above the waterline.  Standing atop the radar
 arch is not something we want to attempt in a rolly anchorage.
Another project on the “eventually” list was getting to the less-optional stage, and that was to replace two duckbill valves in a very tight space located behind the clothes dryer.  These two duckbills are at the top of the anti-siphon loops for the black water pump-out and guest toilet thru-hull discharges, and these two were way overdue for servicing; a failure of an anti-siphon valve could result in an influx of seawater, perhaps even a backflow of effluent – either would be bad news.  While we regularly serviced the five other and easily accessible duckbill valves on the boat (master head, wing engine, generator, etc.) these two required some creativity to access them.
Access Panel Removed...Revealing the Back Half of the Clothes Dryer
that Prevents Any Kind of Access to the Well Hidden Anti-Siphon Valves.

First, an access panel in the guest stateroom had to be opened up, followed by removing nine anchoring screws for the dryer (front & back sides), and then pulling the dryer out about 12 inches into the stairway space that connects the pilot house to the stateroom level.  That gave Rick enough room to angle his shoulders through the small access panel and squeeze into the cramped space behind the dryer; removing the old intake caps and duckbills and replacing with new ones was the easy part.  Reassembly was mercifully undemanding.  Generally speaking the architects at Nordhavn are good at designing sturdy boats with thoughtful maintenance access to most serviceable components….but not in this case.
Unfastening & Pulling Out the Dryer into the Companionway.
With The Dryer Pulled Out We Now Had Access to the Two
Anti-Siphon Duckbill Valves (Yellow Arrows).
Yet another project (actually decision) coming due was what to do about an expiring EPIRB battery at the end of June.  The “Emergency Position Indicating Radio Beacon” is an indispensable piece of safety equipment, particularly when out of VHF radio range.  Capable of beaming SAR GPS distress signals via satellite (along with a Guard channel homing beacon) for 48 hours of continuous signaling, no blue water boater departs the dock without one.  The thing works anywhere on the planet.  Unfortunately the older EPIRB models utilize batteries that expire after five years, at which time they require servicing by an authorized dealer – the batts are technically not user replaceable.
Our Wet Locker is Pretty Packed with Safety
Gear.  Yellow Arrow Points to the New EPIRB,
the Green Arrow to the Old One in the Ditch Bag.
Given that the cost of that service is about half what a new EPIRB costs, and that the latest models have ten year batts which are user-replaceable, we opted to just purchase a new one, an ACR 2831 GlobalFix V4 model.  We mounted this one in the pilot house wet locker, where most of our safety equipment resides – life raft, ditch bag, signaling devices, first aid kit, life vests, throw bag, etc. – and still kept the old one in the ditch bag’s side pocket.  Both are registered with NOAA as Ghost Rider-specific SARSAT devices.  (LINK.)

Periodically we also have to pay attention to the ship’s navigation computer.  From a hardware perspective that’s a reliable device (a Silverstone 12 volt small form factor computer), but unfortunately its operating system is Windows 10 Pro – the TZ Pro navigation software won’t run on anything else.  And that is decidedly not a good OS for what is essentially a 24-by-7 mission critical system.  The Win10 OS likes to “phone home” rather frequently for all sorts of software updates, and we’ve mastered rather surreptitious techniques for bypassing that disruptive behavior while underway; but occasionally when time allows – as when we are stuck in port – it’s a good idea to backup that PC and then let it go through its update procedures…and then test the hell out of it to be sure it didn’t break anything important.
The Ship's 12V Navigation PC is Tucked Under the
Pilot House Console...Which is Fine Until You Need to
Take it Apart to Swap Out Memory (RAM) DIMMs.

So we allowed the OS upgrade itself to the latest release (dated April 2020), which took a couple of hours across several reboots, then regression tested, and thankfully most things looked good afterwards.  It did completely break the non-essential “Stereo Mix” feature that we like to use for our MP3 music library when at anchor or the dock (allows for concurrent use of hardwired and wireless Bluetooth speakers); and it disabled the Open Shell software (we use it to configure Win10 to look more like Win7); but at least all the important navigation features and interfaces remained ops normal.  Rick eventually dug up an older Realtek audio driver that restored Stereo Mix functionality, and then reinstalled the latest version of Open Shell to regain our preferred look & feel of the start menu and desktop.  Rick also took the down-time opportunity to tear into the computer’s innards and upgrade its random access memory from 8GB to 16GB, which should improve overall response time of the ship’s PC going forward.
The Windows 10 System Info Reflects the Upgraded RAM and the New Version of the OS.

Break/Fix Opportunities
Of course no month of boat ownership would be complete without some break/fix activity to drain the wallet and shame the budget.  We found two of those this month.

The first was yet another air conditioning system fault – rather suddenly we had no less than three air handler units intermittently tossing “HI PS” (high pressure) errors, which typically means low flow of raw water cooling to the compressors.  The pathetic dribbles emitting from the thru-hull seawater discharges confirmed that issue, but the question was why – or more precisely, where in the plumbing was the blockage?  Given the suddenness of the problem, and that we had acid washed the A/C plumbing just four months ago, plus the fact that the A/C strainer basket was clear of any obstruction, we were pretty sure the clog was in or near the thru-hull inlet….under the hull.
The A/C Thru-Hull...After Closing the Valve (Red Arrow), Removing the Hose
(Green Arrow), and Unscrewing the Elbow (Yellow Arrow), Rick then
Reopened the Valve.  Should Have Been a Geyser -- and Was Not.

Rick closed that valve, removed the hose and its 90 degree elbow, then slowly re-opened the thru-hull – what should have been a three foot geyser of seawater into the lazarette was barely the equivalent of a water bubbler.  Something was blocking flow on the bottom of the hull, and no amount of auguring with a screwdriver was making any difference.  Nuts.

We placed a call to our diver service (LINK) and requested an off-schedule visit, and a day later one of their divers arrived, dove under the boat and dug out a handful of detritus from the protective grate on the thru-hull intake: a few tiny fish, a small seaweed salad, some cellophane, and a plastic bag.  And that’s what restored normal flow and A/C operations.  

Lastly, we developed a surprise problem with the boat’s crane….and a nasty one at that.  On one of our periodic walk-around inspections of the boat we discovered a stream of hydraulic fluid leaking from the base of the crane, making quite a mess on the boat deck.  After removing the inspection panels on the base the culprit was immediately obvious: the hydraulic reservoir tank had rusted through in a fairly large area. 
The Polished Stainless Crane/Davit Looks Good on the Outside....

For now that leaves us with no mechanism for launching or retrieving the dinghy.  Rick has manually pumped out the remaining hydraulic oil (about two gallons) to prevent more deck messes, and is researching equipment manuals and potential service centers for help in figuring out next steps.  The solution is not likely to be straightforward or inexpensive.  But that’s a topic for a future post.
....But Inside the Base its Hydraulic Reservoir Tank Has Rusted Through.
But Ghost Rider Still Looks Good After a Thorough Shampoo and Rinse to Close Out June.

Tuesday, May 12, 2020

May 2020: Back in FMY - Fixing Stab Overheat

Foreword:  We and the boat are back home in Fort Myers and we’re still being diligent about social distancing and hygiene practices.  Hopefully that’s true for all y’all, too.  But here in the USA, with most states proceeding with “re-opening” without much regard for science, we’re also preparing for a long slog with multiple setbacks looking very likely.  If you want a historical analog, go study the Spanish Flu outbreak of 1918…along with how & why it continued into 1920.  Mark Twain reportedly once said “History doesn’t repeat itself, but it often rhymes.”  It seems we’re destined to prove him right again.  But there is good news….have discovered if you keep a glass of scotch in each hand then you can’t touch your face.  That’s good hygiene.

This entry is all about a system repair and nothing else.  So unless you are a boat geek, or bored enough to seek almost any distraction, you’ll want to skip it.

Even though we’d had a very successful maintenance stop with Yacht Tech in Palm Beach, we still had ample boat projects to keep us busy on Ghost Rider.  But the priority problem-to-solve was the stabilizer oil overheating condition we had encountered at the midpoint of our journey back to Fort Myers.  After a few days at the dock we now had a much cooler engine room, allowing for a relatively relaxed and comfortable approach to troubleshooting…and the luxury of temporarily disabling the main engine without consequence.
The Red Arrow Points to the Main Engine's Heat Exchanger on the Port Side of the Maine Engine.  Tucked Under That, the Blue Arrow Points Out the Gear (Transmission) Oil Cooler.  The Yellow Arrows Point at the Pencil Zincs on the Heat
Exchanger.  And then the Green Arrow Indicates the Down Elbow....Just Underneath that a Small 5/8" Diameter Hose
Branches Off to the Cooling Circuit that Routes Over to the Stabilizer Oil Tank.
The design of the cooling circuit for our stabilizer oil tank is relatively simple. Ghost Rider is an exception compared to most Nordhavns….rather than being keel-cooled with a dry exhaust stack, our Nordy’s main engine is cooled via a raw (sea) water heat exchanger and uses a traditional wet exhaust.  That arrangement provides for a secondary cooling circuit that branches off at the bottom of the main engine’s heat exchanger and is then routed over to the stabilizer oil tank reservoir for additional cooling duties there.  After exiting the stab oil tank, that auxiliary cooling circuit empties into the sea via its own dedicated discharge thru-hull.  Except now we could not detect any outflow coming from that thru-hull opening….meaning no cooling flow.
The Stabilizer Oil Tank is Located in the Port Side Forward Alcove of the Engine Room.  The Yellow
Arrow Points to the Input Cooling Line that Branches Off the Bottom of the Main Engine's Heat Exchanger.
The Green Arrow Points to the Output Line that Goes to the Thru-hull Discharge.
So there is a minor flaw in that design:  while the heat exchanger itself is quite beefy, by necessity it utilizes two sacrificial pencil zincs (anodes) to prevent galvanic corrosion inherent with that salty seawater flow…and as those zincs decay (as intended) the shedding debris will descend to the bottom of the heat exchanger – right where that stabilizer cooling loop begins.  That loop uses much smaller diameter hosing and piping (5/8” ID), and occasionally is prone to clogging with that decaying zinc detritus.  When that occurs the result is hot stabilizer oil….rather than the normal 155F temps we were seeing nearly 200F on the leg to Marathon following the overtemp warning light.
Flushing the Line Going from the Heat Exchanger to the Stabilizer Oil Cooling Loop.  The Red Arrow Points to One of the Two Pencil Zinc Ports We Used for the High Pressure Flush Out.  The Yellow Arrow Indicates the Low Point of the Stab Cooling Circuit Where We Diverted its Feed Hose Into a Drain Bucket.
Rick decided to start the investigation where the stabilizer cooling loop originates at the bottom of the main engine’s heat exchanger.  After removing the two zinc plugs (they were due for replacement anyway) and disconnecting a segment of the hose feeding the start of the stab cooling circuit, he stuck a high pressure hose into the zinc ports for a flushing out.  While that netted some debris it certainly was not enough to cause a blockage or overheat issue.
After Disconnecting the Stab Oil Tank's Cooling Hose from the Thru-hull Discharge (Yellow Arrow) and Augering Out
a Significant Zinc Debris Blockage, We Observed a Good Cooling Flow from the Hose End (Green Arrow.)
After reassembling the main engine side of the loop, the next step was to check at the opposite end of the stabilizer cooling circuit, where it exited the boat via the thru-hull fitting.  It was a likely suspect since there was a 90 degree elbow where the outflow hose clamped to the thru-hull fitting – and in there Rick found enough stray zinc debris to form a very effective dam.  A stiff wire coat hanger server as a suitable plumbing auger, and in the end that blockage turned out to be the only culprit.  After clearing the clog and starting the main engine we observed good cooling flow exiting from the thru-hull discharge.
The Yellow Arrow Points Out the Resulting Normal Stab Cooling Flow from the Thru-hull.
The question now was whether such an event could be prevented in the future.  The zinc decay itself is a critically important feature that protects expensive diesel engine parts from dissolving through galvanic corrosion; it would not be wise to change that portion. One option was to design an entirely separate cooling loop for the stabilizer oil tank, which would entail a new intake thru-hull as well as a new electric water pump (and then sealing off the existing feed from the heat exchanger.)  But another path was just to insert a sea-strainer device into the existing cooling circuit to trap zinc debris, with periodic inspection and cleaning.  The latter sounded a whole lot easier and cheaper, at least as a first try.  So that’s the approach we’ve taken for now.  Rick installed a standard Jabsco PumpGuard strainer at the circuit’s low point, close to where it branches off the main engine’s heat exchanger.
The New Sea Strainer Inserted into the Stabilizer Cooling Circuit at its Low Point.  It's Positioned Just Under the Front End
of the Main Engine Where It's Readily Visible and Accessible for Cleaning When Necessary.
It was a relatively simple modification, but it needs to be sea-trialed to determine whether it still allows for an adequate flow rate for cooling the stabilizer oil tank.  A better long-term solution might also call for an inline shut-off valve just upstream of the strainer to allow cleaning of the strainer basket without having to first shut down the engine and drain the heat exchanger (that beast holds a LOT of sea water.)
Just What is a Heat Exchanger?  The Schematic Above is Generic, but is a Good Illustration.  It's Basically Like a Car's Radiator, but Instead of Outside Air Cooling the Antifreeze that Circulates Through the Diesel Engine, it Takes in Seawater to Perform the Same Function.  On Ghost Rider a Portion of the Seawater is Expelled Through the Wet Exhaust, but Another Portion is Routed to the Stabilizer Oil Tank to Perform Cooling Duties There.